Showing posts with label Heat Embossing. Show all posts

Monday, February 4, 2019

Spice up - An Art Journal Page: TTC#8

Hi friends,

January is already over and we have stepped in the month of Love. So the theme this month at The Twisted Challenges is: Valentine's Day + No Red/ Pink.


As usual I have created an art journal page. I have never had so much fun creating an art journal page as this one. The theme I choose for this page is Aphrodisiacs. I created a galaxy background and added various food aphrodisiacs (wine, strawberries, cherries, chilis, oysters, cream, grapes, chocolates, mint & Avocados) as focal point to depict pure & sensual love making. As we couldnt use red or pink, I choose to use images of white strawberries and cherries instead of pink/ red ones.


Steps To Create:


  • I painted the background using Camel Artistic Acrylic Colours: Prussian Blue, Cobalt Blue Hue and Deep Magenta.
  • Once the background was dry, I created splatters using Camel Artistic Acrylic Color Titanium White.
  • I took prints of various aphrodisiacs or cut them out from new paper and adhered them on background using Camel Gel Medium.
  • Once the page was dry, I stamped "Spice Up" Using Concord & 9th "Perfectly Penned" set using Versamark ink & heat embossed using Ranger Gold Embossing Powder.
  • To finish the page, I adhered a print out of quote "Lets make crazy loving memories together".

I hope you love this page as much as I do. The last day to participate in the February challenge at The Twisted Challenges is 28th February 2018. Hop on to our blog to see other inspirations and know more details about challenge rule.

Love,
Dr. Neha Sanwalka Rungta,
Crafty Flirtations &

Tuesday, August 7, 2018

Word Cloud - Art Journal Page

Hi,

I am here today sharing another page from the art journal I made for Tejal. While making this journal, I wanted to make a word cloud with words that best describe Tejal. Tejal is many things to me - a friend, a philosopher, a crafter, an inspiration and much more. I wanted to capture some of these feelings. So I got brain storming with Saumya about words that can best describe Tejal and some of the words that Saumya suggested were "Cheese-licious" & "Tea-rrific" as Tejal loves cheese & tea. Tejal also loves Amish, the writer, hence Amish Lover with a heart ;) She is an amazing card maker and very very frank. So putting together these and a few more words, I created a word cloud on MS PowerPoint and used it as a focal point on this page.

Word Cloud Art Journal

Saumya had told me that Khushboo's favorite motif was anything that was colorful and around the same time that I was making this art journal, I had purchased the Dylusions Paint Pens and the Simon Says Stamp Ornate Background Stamp. So instantly I decided that I am going to use the stamp to create a colorful motif and color it in using the Dylusions Paint Pens to create the background for this page. This background was so beautiful in itself, that I didnt have the heart to adhere the word cloud directly on this stunning background. Hence, I used a vellum paper to adhere the word cloud over this stunning background.

Word Cloud Art Journal


List of Supplies:
  • 6 by 7" card stock/ chipboard
  • Little Birdie 2 in 1 texture paste (used as gesso)
  • Simon Says Stamp Ornate Background Stamp
  • VersaMark Ink
  • Ranger Black Embossing Powder
  • Dylusions Paint Pen
  • Vellum paper 
  • Pie lane flourish stencil
  • Ranger texture paste
  • White pixie dust
  • Word cloud printout
  • Heat gun, palette knife
Word Cloud Art Journal

Steps to Create:

  • Create Word cloud in Powerpoint and take a print on 300 gsm card stock. 
  • Apply gesso on card stock/ chipboard base and set aside to dry.
  • Once the gesso is dry, stamp the Ornate stamp with VersaMark ink, cover with black embossing powder and heat set it. 
  • Color the design using paint pens. Make sure all the powder is set and wipe the surface with a dry cloth before coloring as any powder residue will block the paint pens. 
  • Cut Vellum to the size of base chipboard. Apply texture paste through stencil with help of palette knife and sprinkle with pixie dust.
  • Adhere the word cloud on vellum with glue.
  • To finish the page, adhere vellum to the base page on one side. 

Word Cloud Art Journal

This is page number 8, so 2 more to go after this. You can view other pages by clicking on caption below each image.

Page 1

Page 2


Page 3

Page 4

Page 5

Page 6

Page 7

I hope you all like this word cloud page.

Love,
Dr. Neha Sanwalka Rungta
Crafty Flirtations

Friday, May 18, 2018

A single rose can be a garden - Art Journal Page

Hi Friends,

Life is a balance of good and bad times. Happy & sad moments. We may rejoice one moment whereas in the other moment we may be faced with a difficult situation. And only those friends who stand by you and be with you in the most difficult times of life pass the test of friendship. True friends never leave your side in either good or bad times. They are always there for you and they become an integral part of the world. 


The page 2 in the art book that I make for my friend Tejal revolves around this truth of life. Though I have never met her in real life, she has been my constant support & true friend in both thick & thin times of life over the last 1 year. We chat almost daily and I cant thank her enough for the amazing friendship. I choose another one of Tejal's favorite flowers "Roses" for this page as a rose depicts these feelings in true sense. The beautiful, fragrant rose flower depicts the beautiful moments of life whereas the thorns depict the difficult times of life. 


I used 2 different styles and colors of roses (red to depict happy times and black to depict difficult times) to build this page. Red is also one of Khushboo's (Tejal's friend) favorite color and black Tejal and my favorite color. I used glitter & shine on the red side to give an extra edge of happiness to good times of life. 


Supplies used:
  • 6 by 7" card stock/ chipboard 
  • iCraft rose & circular rose stencil
  • iCraft kraft card stock
  • Ranger texture paste
  • Pie Lane red pixie dust
  • VersaMark Ink
  • Ranger Black Embossing Powder
  • Distress ink: Black Soot, Candied Apple 
  • Dress My Craft Sparkling Dust 
  • Itsy Bitsy 2 in 1 texture paste (used as gesso) 
  • Circle cutter or die 
  • Finger dauber, palette knife, foam tape, glue, water mister, blending tool, heat gun 
  • Printed sentiment/ quote 


Steps to create:

  • Apply gesso on the card stock/ chipboard base and let it dry. Blend Candied Apple Ink, mist with water and dab with cloth (this ensures very light shade of ink on the base).
  • Apply texture paste through stencil on the right upper half of the page, sprinkle red pixie dust and set aside to dry.
  • Cut circles (2" diameter) from kraft card stock. Apply VersaMark ink through stencil using finger dauber and heat set using black embossing powder.
  • Adhere the heat embossed circles on the page using glue & foam tape for dimension. 
  • Apply glue on the right edges of the page and sprinkle with Sparkling Dust.
  • Finish the page by adhering the printed sentiment/ quote.


Please do let me know what you think of this page. I hope you like it as much as I loved making this. 


I would like to enter this art page at 


I shall be soon back with Page 3 of this art journal.

Love,
Dr. Neha Sanwalka Rungta
Crafty Flirtations 

Thursday, May 17, 2018

To Great Friends - An Art Journal Page

Hi friends,

They say friends are the family you choose for yourself & God has blessed me with some amazing friends who are now like family to me. Recently, I wanted to make a gift for my ever helpful, crazy, amazing crafty friend "Tejal", something that was personalized and woven with  elements that she & 3 of her friends (Saumya, Khushboo & myself) liked.

As Art Journals are my absolute favorite to make, I decided to make a mini, personalized Art Journal or Art Book for Tejal including our favorite quotes, motifs, colors & flowers or things that we like.


I used a 6 by 7 ready chipboard album to create this art journal as I wanted something sturdy and strong as it was going to travel all the way to Ahmadabad from Mumbai, but you could use a 300 gsm card stock for same. This art book contains 10 sides (5 pages back to back) all together. Here's the cover page of the journal.


Tejal's favorite flowers are Hydrangeas. So, I decided to use them as focal point on the cover page. However, when I started making the cover, I realized I didnt have  any Hydrangea stamps. I was on verge of giving up the idea of using Hydrangeas on the cover, when it dawned on me that I had Hydrangea Lawns pattern paper from Dress My Craft that I could use for focal point. The entire page is built around colour scheme of Hydrangea flowers using the heat embossing resist technique with Distress Inks for background as its my absolute favorite technique for background.


Supplies Used:

  • 6 by 7" card stock/ chipboard 
  • Dress My Craft Hydrangea Lawns 6 by 6 paper pack
  • Penny Black Blooming Gardens stamp set
  • Distress Inks: Seedless Preserves, Cracked Pistachio, Peacock Feathers
  • VersaMark Ink
  • WOW! Clear embossing powder
  • Itsy Bitsy 2 in 1 texture paste (used as gesso)
  • Dress My Craft Frosted Sugar Powder
  • Glue, scissors, foam tape, heat gun & blending tools
  • Printed sentiment 


Steps to create:

  • Apply gesso on the card stock/ chipboard base and let it dry. Once dry, apply Cracked Pistachio and Peacock Feathers ink using blending tool. 
  • Once the Distress ink has dried, stamp the flowers using VersaMark ink and heat set using clear embossing powder.
  • Apply Seedless Preserves (over Peacock Feathers) and Peacock Feathers (over Cracked Pistachio) ink to create a beautiful resist technique background.
  • Fussy cut the flowers from Hydrangea Lawns pack. Distress the edges using Seedless Preserves ink  and adhere to the base using glue & foam tape.
  • Apply glue to the edges of the page and sprinkle with Frosted Sugar Powder.
  • To finish the page, adhere the printed sentiment/ quote. 

Hope you love the cover page from this art journal. I shall be back soon with Page 2 of the journal.

I would like to enter this art page at 


Love,
Dr. Neha Sanwalka Rungta
Crafty Flirtations. 

Monday, April 9, 2018

Itsy Bitsy Little Birdie Embossing Texture Paste - Product Review

Hi Folks,

I am here with a review of Itsy Bitsy's Little Birdie's Embossing Texture Paste. Itsy Bitsy launched this paste in February 2018 during the opening of their 2nd Mumbai Store. When Rashmi Harish, owner of Itsy Bitsy showed me swatch of the Embossing Texture Paste, I knew I had to buy one.

About Embossing Texture Paste:

  • Comes in 12 amazing colours. 
  • Can be applied on various surface such as paper, metal, wood, glass etc. using a palette knife. 
  • Once you have applied the texture paste, you need to heat set it to get the crazy amazing texture. 
  • It's water resistant when dry but not washable. 
  • On heat setting, it dries to matt finish. 

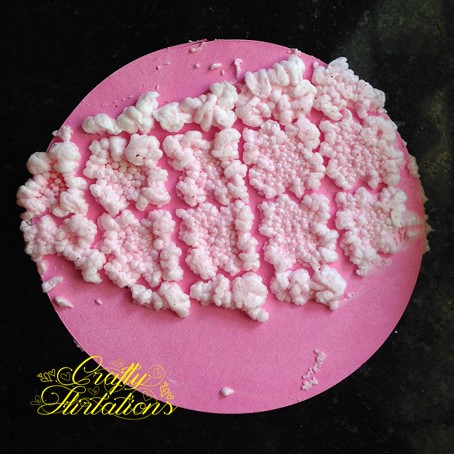
Off the 12 colours, I brought the Frosty Fizz Embossing Texture Paste and here are the swatches I created to test the various effects with different mediums before I could incorporate in my project.


I applied Embossing Texture Paste through a stencil on Kraft Card-stock and heat set it. I absolutely love the bubbly matt finish of the paste. Would add amazing texture on any mixed media project . The more you heat the paste, the more bubbles it creates. A thicker layer of paste would give you bigger bubbles as compared to thin layer of paste (P.S. the small red dots are that of pixie red glitter that were on my stencil & got incorporate in the design).


After heat setting the Embossing Texture Paste on white Card stock, I sprayed it with Lindy's Starburst Spray Hydrangea Blue. It produced a fun shaded effect.


I blended some Distress Oxide Picked Raspberry Ink on Card stock and applied Embossing Texture Paste over it through a stencil. As Oxide inks are water reactive and stay wet longer, the paste absorbed some ink and on heat setting I got a pretty pink and white textured effect. 


I blended some Distress Ink Picked Raspberry on Card stock and applied Embossing Texture Paste over it through a stencil. Distress Inks are water reactive but dry quickly as compared to Oxides and the absorption of Ink was lesser by the paste in this case.


After Heat setting the Embossing Texture Paste on card stock blended with Picked Raspberry Distress Oxide Ink, I applied some Wilted Violet Distress Oxide Ink and sprayed it with water. The paste absorbed some of the pigment from the ink and gave an amazing purple look.


Similar effects were achieved when I applied Candied Apple Distress Ink on heat set paste and sprayed with water. Similar effect can be achieved with any dye inks. 


My Verdict:
  • The Embossing Texture Paste is a must for all Mixed-Media artists.
  • Adds amazing texture to projects. 
  • Absorbs inks from the background if the background inks are water reactive
  • If you want to retain the colour of your Embossing Texture Paste when applied on water reactive ink blended backgrounds, seal the background with mediums such as Distress Glaze or Gel Medium before applying the paste. 
  • Stains or absorbs pigments when applied on top after heat setting. 
  • At Rs. 249/- its absolutely worth the money. I am soon going to buy the rest of the shades for my mixed-media adventures. 
I had absolute fun using this product. Will soon share a Mixed-Media project where I used Embossing Texture Paste.

Hope you find the review helpful. 

Love, 
Dr. Neha Sanwalka Rungta
Crafty Flirtations 

(Disclaimer: I am not affiliated with Itsy Bitsy or Little Birdie nor have I been paid to write this review. This review is purely my personal opinion based on my experience of using this product) 


Wednesday, January 17, 2018

Your Love Gives Me Wings To Fly

Hello Friends,

It's almost a month to go for Valentine's day, but we all start making cards & gift items early. So here, I am sharing with you a frugal mixed-media layout for Valentine's  gitf.


  • I wrapped some laces I had at home around a 3 by 8" piece of plywood (scrap piece of plywood).
  • Apply a coat of Gesso. Once the Gesso was dry, I coloured the background using spray paints I made at home (You can find numerous frugal recipes on YouTube).
  • For the focal point, I cut a heart from a red card stock and applied red glitter on it using glue.
  • I drew wings on vellum using Ranger Emboss It pen and heat embossed it using White Embossing powder. Then I fussy cut the wings.
  • I stamped sentiments on white card stock and applied a coat of Glossy Accent on them.
  • To finish the piece, I adhered wings, heart and sentiment on the coloured ply using Glossy Accent. 
Hope you enjoyed this quick & frugal Valentine's gift.

Love, 
Dr. Neha Sanwalka Rungta
Crafty Flirtations 


Friday, January 5, 2018

Rocky Roads Art Journal

Hi Friends,

Happy New Year to all of you. In my 1st blog of 2018, I am sharing an Art Journal Spread with a total of 7 supplies (Apart from basic supplies). I absolutely love the quote "Difficult roads often lead to beautiful destination" as its such a huge motivation and confidence booster and this Art Journal Spread is all about it.


Supplies Used:

  • iCraft Stencil (rock/ stone stencil)
  • Ranger Distress Ink: Picked Raspberry
  • iCraft MDF Phrase 
  • Sakura White Gelli Roll Pen 
  • Sakura Black Brush Pen
  • Ranger Gold Embossing Powder 
  • VersaMark Embossing Inkpad 
  • Basic Supplies: Blending Tool, Heat Gun, Glue
Steps to Create: 
  • Ink the MDF phrase with VersaMark Ink and heat set with Gold embossing powder.
  • On your art journal, blend Distress Ink with help of a blending tool through a stencil.
  • Once you have stencilled on the entire page, colour the negative space using a brush marker or any black pen that is water proof.
  • Once the ink is dry, flicker some water to reactivate Distress Ink and create texture.
  • Outline each stone using white Gelli Roll pen.
  • Adhere the embossed MDF phrase to finish the page. 
Additional Tips
As this was a 4 by 8 stencil, there were a few harsh lines where ever the stencil ended. I connected some Inked rocks with help of paint brush & Ink to remove harsh end-lines of stencils and make the page look more generic 


I hope you like my simple page, yet quirky Art Journal Page.

Love,
Dr. Neha Sanwalka Rungta 

Saturday, December 16, 2017

It's The Seasons To Be Jolly - Art Journal

Hi Friends,

Art journal for me is not just a way of expressing my thoughts, feelings, moods but its also about trying different techniques that I have been meaning to try for a long time. As Christmas is around the corner, I made an art journal page with Ornaments as my focal points and used a few different techniques to create my focal points.


Supplies used:
  • Ranger Distress Ink: Cracked Pistachio, Candied Apple, Wild Honey
  • Cosmic Shimmer Mist: Meadow Lush, Blue Lime
  • Ranger Archival Ink: Red Geranium, Jet Black
  • VersaMark Ink 
  • Art Anthology Dimensional Medium - Brick (Stone Effect)
  • iCraft Stencils
  • iCraft Floral Natura Paper Card stock 
  • Snowflakes Stamp
  • Concord & 9th: Sophisticated Script Stamp Set
  • Ranger Clear Ultra-thick Embossing Enamel (UTEE)
  • WOW Cherry Red Embossing Powder
  • Ranger Glossy Accent 
  • Rhinestones, palate knife, foam tape, yellow floss, circle cutter, heat tool  

Steps to Create:
Background: 
  • Blend Cracked Pistachio ink on the art journal.
  • Stamp snowflakes stamp (2nd generation stamping) using Red Geranium Ink.
  • Spray the cosmic shimmer sprays at a close distance on random spots and let it dry .
Pre-preparation for ornaments:
  • Cut 2" diameter circle from white card stock using circle cutter or a die (6 in number).
  • Blend Wild Honey ink on the cut circles.
  • Cut small small squares from card stock and colour using Candied Apple Ink.


1st Ornament from Left:
  • Blend Candied Apple Ink on the prepared ornament through iCraft circle cluster Stencil.
  • Once the ink is dry, apply Glossy Accent on each of the circles and keep it aside for drying. 
2nd Ornament from Left:
  • Blend Candied Apple Ink on the prepared ornament through iCraft Stencil. 
  • Once the ink is dry, apply a layer of Glossy Accent on the full circle.
  • Once dry, reapply a second coat of Glassy Accent and keep it aside for drying.

Centre Ornament:
  • Rub VersaMark Ink on the prepared ornament and sprinkle UTEE and heat set.
  • Once the UTEE is evenly melted and hot, sprinkle another layer of UTEE and heat set again.
  • Repeat the process 3-4 times to get a thick layer.
  • Once happy with the thickness of the enamel, randomly sprinkle some Cherry Red embossing powder and heat set and while the entire enamel layer is still hot, stamp on it with Snowflakes stamp to give an embossed effect (Rubber stamps work the best for this technique and before stamping on hot layer of enamel, apply VersaMark Ink on the stamp to prevent any damage from Enamel).

4th Ornament from left
  • Simply stamp some snowflakes on prepared ornament and heat set with Cherry Red Embossing powder.

5th Ornament from left
  • Apply a generous layer of stone effect Art Anthology Brick Dimensional paste through iCraft stencil on the prepared ornament and let it dry.
Last Ornament:

  • Splatter few drops of watered-down Candied Apple Ink on the ornament & embellish with a few rhinestones.
To finish all the ornaments:
  • Adhere the coloured red squares and floss on the ornaments to complete them.
Finishing the Art Journal page: 
  • Arrange and mark placement for your ornaments on the page.
  • Using some water-down Candied Apple ink, create a shadow effect on the outer ends of markings (as the Candied Apple ink re-activates some of the green inks on backgrounds, it creates a subtle shadow for ornaments.
  • Once the ink is dry, adhere the ornament  to the page with foam tape and give an uneven outline to the page with colour of your choice.
  • Adhere the extra floss on the backside with glue.
  • To finish, stamp the sentiment using Jet Black Ink and Sophisticated Script Stamp Set.

I hope you enjoyed reading about my Art Journal Page. 

Wish you a Merry & Bright Christmas :) 

Love,
Dr. Neha Sanwalka Rungta
Crafty Flirtations 

Saturday, February 18, 2017

Double Heat Embossed Flowers

Hi Friends,

Today I bring to you an experiment that I have been wanting to do for a long time & the results of which I am totally in love with. I used Mudra Daisy Bloom Layering Stamp Set. I have double heat embossed the flowers in the card below, i.e. both the yellow & red in the card below are heat embossed. Read below for instructions


Close Up Of Flower: I love how the red & yellow split and mix to form orange and give a very rustic & realistic look to the flowers


Material:
  • Mudra Daisy Bloom Stamp Set
  • Mudra Happy Birthday Sentiment Stamp Set
  • Watermark Versamark Ink
  • WOW Primary Yellow embossing powder
  • WOW Primary Cherry Red embossing powder
  • Scattered Straw Distress Ink
  • White Cardstock, Vellum & Ranger Heat gun
Instructions:

  • Stamp the 1st layer of Daisy Bloom stamp with Versamark ink, sprinkle with WOW Primary Yellow embossing powder and heat set
  • Stamp the 2nd layer of Daisy Bloom stamp with Versamark ink, sprinkle with WOW Primary Cherry Red embossing powder and heat set just enough to melt the red embossing powder into yellow. Be careful to not overheat
  • Distress edges of cardstock with scattered straw distress ink
  • Stamp the "Happy Birthday" sentiment on vellum with Versamark ink, sprinkle with WOW Primary Cherry Red and heat set
  • Put the card together and add some sequins to complete the card
Hope you all love the double heat embossed flowers on my card.

Do leave some love if you liked the card.

Love,
Dr. Neha Sanwalka
Crafty Flirtations 

Thursday, February 16, 2017

Lets Get Inky - Paper comparisons

Hi Friends,

A few days back, The Craft Studio launched 2 sets of paper: Floral Natura Collection (FNC) and Floral Super White Collection (FSWC). I received a pack of sample papers from Foram Shah & Dinesh Shah of The Craft Studio.

About these papers: 
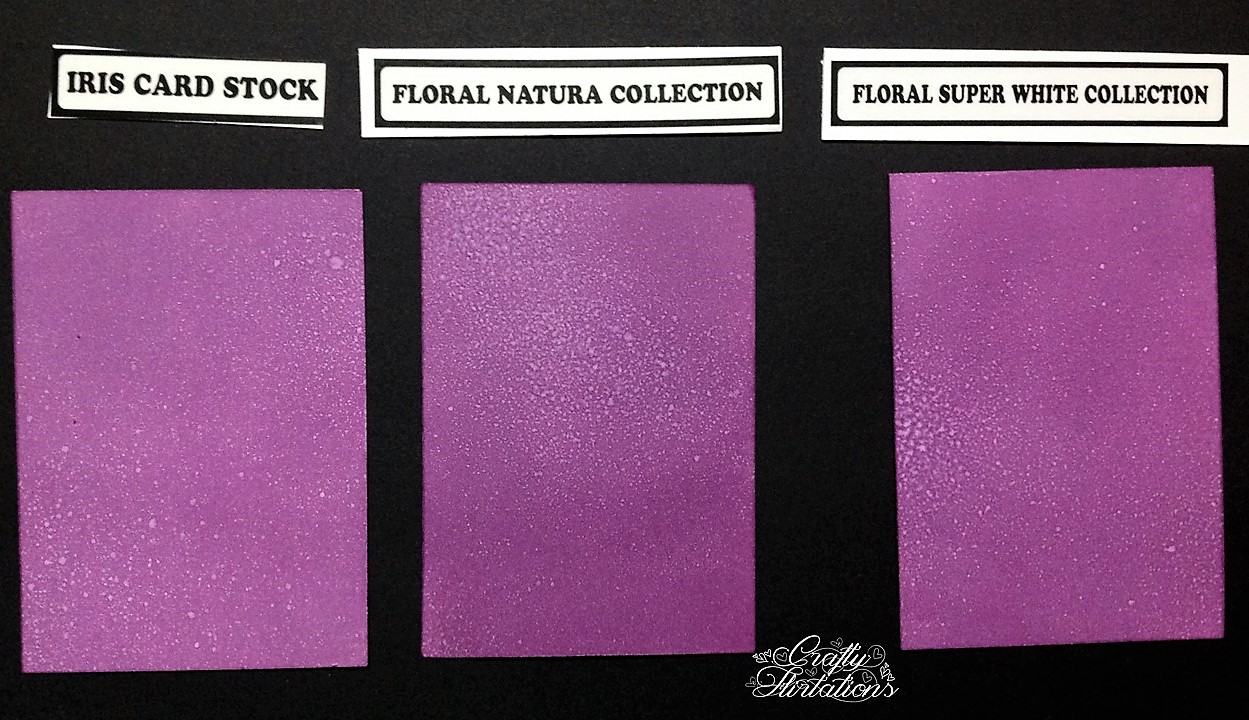
Both FNC and FSWC are 270 gsm in weight. FSWC is pure white and is more whiter than Iris paper while FNC is one shade pale and has colour same as Iris paper. FNC and FSWC have good water retention ability with FSWC being able to absorb more water as compared to FNC.

Even thought these papers were launched as papers to make flower, with 270 gsm and good water absorbing properties, I decided to try them for my card backgrounds and inking techniques, heat embossing, water colouring etc. and compare it with Iris paper (as I use the same for background techniques regularly).

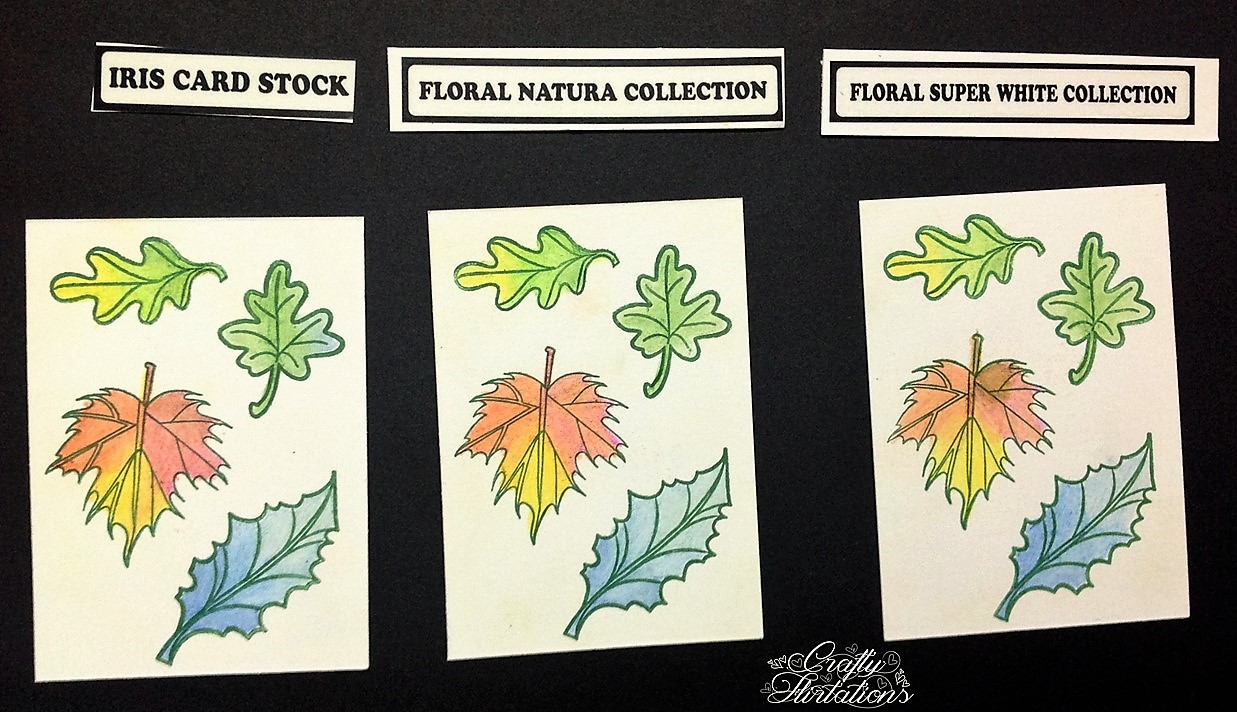
So, FNC, FSWC and Iris paper were cut to ATC size of 2.5" by 3.5" and put to test for various techniques

Test 1: Distress ink & misting.
Result: My experience in Mumbai city has been that when you use distress ink on Iris paper and let it sit for some time, the distress ink goes a shade lighter. Similar results were seen on FNC & FSWC. So compares with Iris paper exactly


Test 2: Distress Ink Blending
Result: Distress Ink Blending was good on both FNC & FSWC and comparable with Iris paper. FNC overall had slightly better outcome for ink blending as compared to FSWC


Test 3: Distress ink  smooshing with help of acrylic block
Result: Results were good for all 3 papers (The acrylic block I used had a grid and there were grid marks on the outcome. As you notice, grid marks are almost negligible on FSWC, which I assume are because of its high water soaking capacity. So I would choose FSWC for this technique)


Test 4: Distress ink smooshing with water mist from a craft mat
Result: Excellent for all 3 papers


Test 5: Water lifting technique
Result: Even though all 3 papers worked well for water lifting technique, FSWC performed much better than FNC for this technique. I love the outcome for water lifting on Iris and FSWC more than FNC


Test 6: Stamping with distress ink
Result: Similar effect on all 3


Test 7: Watercolour 
Result: With my limited knowledge in water colouring, I tried all 3 papers for water colouring a Peony. All 3 papers worked equally well for this technique. Amongst 3, FSWC with it high water absorbing capacity worked the best for water colouring.


Test 8: Stamping with Archival inks
Results: Fantastic for all 3 papers


Test 9: Heat Embossing & Resist distress inking
Result: Excellent for all 3 papers


Test 10: Pencil colour & blending with odourless thinner


Test 11: Gelatos for background & blending with baby white
Result: Good for all 3


Test 12: Cosmic Shimmer Spray & Itsy Bitsy Splash Spray for background & Scoring
Result: To test the strength of both FNC & FSWC, I scored both the papers & neither paper tore, i.e. they scored well. Also water based spray paints like Cosmic Shimmer Spray & Itsy Bitsy Splash Spray worked well on both papers 


To sum up, both papers were comparable to Iris paper for most techniques and give excellent results. 

Thank you Forum & Dinesh Shah for the free samples. I loved working with both of them. 

PS: I would be converting these into ATCs. So if anyone would like to swap/ trade one of these ATCs with me, please leave a comment. I am open to swapping internationally too. 

Hope you all enjoyed comparison review of FNC & FSWC with Iris paper. Do leave your feedback in comments below. 

Love,
Dr. Neha Sanwalka
Crafty Flirtations