Showing posts with label Itsy Bitsy. Show all posts

Tuesday, April 2, 2019

Create Wings - Art Journal - #TTC10

Hi friends,

Welcome back after a months time. Well I have been excessively busy the last month with work commitments but as we start a new challenge at The Twisted Challenges today, I decided to take a break for sometime to create the inspiration. The theme this month is "Animals + Wings", i.e you need to use an animal image and add wings to the animal.You have to use animals that do not have wings and add wings to them.



As usual, I have created an art journal page for the inspiration. I used minimal products for this page and is very easy to create.

Create Wings - Art Journal - TTC#10

Create Wings - Art Journal - TTC#10

Create Wings - Art Journal - TTC#10 
Create Wings - Art Journal - TTC#10


  • I colored a page in Little Birdie Mixed Media Journal using Ranger Candied Apple Distress Ink.
  • Using a tree stencil from icraft, I applied Nuvo Silver Mousse on the page.
  • I pencil colored some animal digital stamps from http://www.opalmanor.com/digistamps and fussy cut them.
  • The wings were die cut using various butterfly dies.
  • The wings and animals were adhered on the page using glue.
  • Quote was added to the page to finish the page.
I hope you all loved this quick, simple and bright page and are inspired to add wings to your life to achieve something spectacular in life. Hop on to The Twisted Challenges blog to know more about the challenge rules and to see more inspiration from the team. 

Love,
Dr. Neha Sanwalka Rungta
Crafty Flirtations 
The Twisted Challenges 

Tuesday, January 15, 2019

DIY Wall Hanging/ Bag Tassel

Hi Friends,

Have you guys checked out the January challenge at The Twisted Challenges Blog? The theme this month is: Something Old, Something New, Something Borrowed, Something Blue. For the mid month inspiration, I created a quick and simple bag tassel that can also be used as a wall hanging.


  • I used a very old background made using Distress Inks (I would have made this at least 3 years ago) and trimmed it to 3.25 by 3.25" size (Something Old).
  • I colored the edges using Chameleon Marker - Royal Blue (BL6)
  • I punched 2 wholes using a round punch and on one end I tied an old bead tassel (Something old) using some wire.
  • I recently received some new years gift from Itsy Bitsy and the gift contained a pack of Little Birdie Eufloria Handmade Flowers in a very light blue shade. I choose one of the blue flowers (Something New) and colored it using Lindy's Starbusrt Baby Blue Eyes Aqua spray (Something blue) and let it dry .
  • Once the flower was dry, I adhered it on the tassel end of the base and add a bead on it (which also I received as a gift from Itsy Bitsy on New Year's. 
  • I used a butterfly die cut (cut using a die I borrowed from Tejal) (Something Borrowed) and colored it using the same Lindy's Starburst Baby Blue Eyes Aqua and adhered it above the flower.
  • To finish the tassel, I strung in a blue thread through the other punched hole.

I hope you liked this simple & quick tassel.

To know more about the challenges & see other inspirations, click here. Last date to participate in the challenge is 31st January 2019.

Love,
Dr. Neha Sanwalka Rungta
Crafty Flirtations 
&
The Twisted Challenges 


Thursday, August 2, 2018

Breastfeeding Week Art Journal Page

Hi,

Today I am sharing a page that highlights a cause that is very close to my heart - Breastfeeding. Did you know that 1st to 7th August is celebrated as World Breastfeeding Week every year? You may wonder why is there a need to celebrate and promote breastfeeding? Isnt it the most natural thing every mother does for her child? Sadly not. As per statistics published in The Times Of India Online Edition, only 42% Indian infants are breastfeed within 1st hour after birth, i.e. 58% are deprived of the benefits of early feeding & colostrum in India. Not only that, only 55% infants are exclusively breastfed for 1st six months (WHO guidelines). These sort of statistics for breastfeeding are found across the world in many countries and hence, the celebrations for World Breastfeeding Week. Breastfeeding is not luxury. Its birth right of every child who comes to this world. Its the best blessing a mother can give her child. Hence, I created this page around breastfeeding, as my small contribution to the celebrations this year. You can read more about World Breastfeeding Week by visiting here

Breastfeeding Week Art Journal

List Of Supplies:

  • Little Birdie Mixed Media Journal
  • Little Birdie 2 in 1 texture paste (used as gesso) 
  • Lindy's Stamp Gang - Starbust - Baby Blue Eyes Aqua
  • Art Anthology Dimensional Paint - Baby Blue Eyes, Blue Topaz
  • Designs By Ryn - Fiddlehead set
  • Concord & 9th Perfectly Penned Stamp set 
  • Ranger Archival Ink - Cobalt
  • Tim Holtz Mini Stencil
  • Sakura Microns & Brush Pen
  • Ranger Glossy Accent
  • Silver Inka Gold 
  • White card stock
  • Palette knife, paint brush, glue, pencil
Breastfeeding Week Art Journal

Steps to create:
  • Apply gesso on the art journal page and let it dry.
  • Roughly illustrate a mom feeding a baby on the page. 
  • Color the page using Lindy's spray. Instead of using it as a spray, I painted the page with a paint brush using Spray color as an ink. 
  • Once the ink is dry, do 3rd generation stamping using Fiddlehead stamp and blue ink.
  • Apply Art Anthology dimensional paints with help of palette knife and stencil.
  • Once the dimensional paint is dry, rub silver Inka Gold over it.
  • Color the illustration of mom feeding a baby with black pens and add Glossy accents for dimension.
  • To finish the page, stamp (or write freehand) the sentiment and adhere to the journal page.  
The theme at Art Journal Journey this month is "Count Your Blessings" and there can be no bigger blessing than Breastfeeding. I was lucky to be a breastfed child too. Entering my art journal for the challenge here: https://art-journal-journey.blogspot.com/2018/08/count-your-blessings.html 

Please share this page & spread the knowledge & importance of breastfeeding.

Love,
Dr. Neha Sanwalka Rungta
Crafty Flirtations 

Wednesday, June 13, 2018

Litlle Birdie Mixed Media Journal Review + 2 Journal pages

Hi all,

During Creativation 2018 in January, the one and only product that caught my fancy was Little Birdie Art and Mixed Media Journal. If you have been following my work, you already know how crazy I am about Art Journals, however no good hard bound journals were available until now in India. Hence, when I saw the upcoming release during Creativation, I immediately inboxed Rashmi Harish, owner of Itsy Bitsy & Little Birdie to congratulate her for coming up with the journals. To my absolute delight, Rashmi promised to send me one of the journals when the actual production starts and as soon as the journals were released in June, I had the Mixed Media Journal come my way (another surprise that Rashmi actually remembered to send me a journal after 5 months & I am touched by the gesture). Thanks Rashmi.

Now lets come to these journals. There are 3 journals - Art Journal in 220 & 440 gsm & Mixed Media Journal and they come in 2 sizes: 5.5 by 7.5" and 7.6 by 10.2". You can read all about Art Journal here. I am going to review the Mixed Media Journal which Rashmi very sweetly sent me.


Features of the journal:

  • Made in India 
  • Contains 92 pages that you could work on
  • Has 16 Canvas, corrugated, white burlap, natural burlap and handmade paper each
  • Has 12 Kraft cardstock
  • Its hardbound & 100% cold pressed 
  • Its handmade and archival 
  • Very very cost effective (Rs. 999/- or about 15$ when purchasing in India. For price in US and other countries, please hop on to the Little Birdie Website)
I got the journal on Saturday and I already have made 2 journal pages. 

Page 1: 
The 1st page in the journal is a canvas. Being a fan of embroidery, I decided to embroider a rose in the journal & stamp my name. I decided to keep it simple as I wanted to focus on the rose. 

Embroidery on canvas page in Mixed Media Journal By Little Birdie
Steps to create: 
  • I stamped the image from Stampendous Fran's Cling Stamp & Stencil Set - Build A Bouquet Set on canvas using Catherine Pooler Die Ink. 
  • Once the ink was dry, I embroidered the flowers using Anchor floss (3 strings). 
  • For the flower I used normal filling stitch and did leaves using chain stitch. 
  • While I was embroidering, the edges started fraying a little and hence, I sealed the stitches using blanket stitch. 
  • As it was impossible to use an embroidery hop in the journal, the canvas wrapped a little in the process, however, I absolutely the wrapped look. 
  • To finish the page, I stamped my name using the Concord & 9th Script Stamp and Dye inks. 

Close up of rose

Page 2:

For the backside of the canvas, as you can imagine, all the knots and embroidery backing was visible & being the crazy me, I wanted to hide it all so that when I flip the page, I see a beautiful layout & not all the crazy knots. Hence, I created a page separately on a vellum  and adhered it to the backside of the canvas. I like how the blanket stitch is peeping from sides of the vellum.. Gives a very rustic look. 


Steps to create:
  • I stamped as image from Clearly Besotted Thanks a Bunch set using Ranger Archival black ink on Brustro Watercolor paper. 
  • I coloured the image using Peerless watercolors & fussy cut it. 
  • I coloured a 5 by 7" vellum sheet using Ranger Alcohol inks: Lettuce, Butterscotch and silver. 
  • Then I adhered the vellum at the back of the canvas using Range Glossy Accent. 
  • To finish the page, I adhered the coloured image & printed quote using glue. 

I hope you love these simple, yet fun mixed media art journal pages. If you love Art Journalling and if you want t o challenge yourself to create art journal spreads on various textured backgrounds, Little Birdie Mixed Media Journal is a must buy. I shall be back soon with more pages in this amazing Mixed Media journal. 

I would once again like to thank Rashmi for sending this amazing journal. 

Love, 
Dr. Neha Sanwalka Rungta 


Friday, May 4, 2018

Dream - Floral Mixed Media

Hi Friends,

I reviewed the Little Birdie Embossing Texture Paste a few days back. Today I am back with a project where I actually used the Embossing Texture Paste for some quick & amazing effects.


Supplies:
  • Little Birdie 2 in 1 Texture Paste (use as Gesso)
  • Little Birdie Embossing Texture Paste Frosty Fizz
  • Little Birdie Flower Pack 
  • iCraft MDF
  • Penny Black Stencil Hypnotic 
  • Ranger Distress Spray Paint - Squeezed Lemonade + Home made spray inks in shades of yellow and light orange  (numerous recipes available online)
  • Nuvo Embellishment Mousse - Fresh Copper 
  • Palette knife, glue, hot glue gun, flower pollen, heat gun
  • Canvas/ Ply 
Steps To Create
  • Apply some Gesso on the base and let it dry.
  • Adhere mdf with glue and apply Gesso over it.
  • Once the Gesso is dry, colour using spray inks and let it dry.
  • Apply embossing texture paste through stencil and with palette knife on corners and heat set. 
  • Apply nuvo mousse on embellishments and rub here and there on the canvas for added texture.
  • Finish by adhering flowers and pollen. 


Hope you loved this quick, simple & beautiful mix-media layout. I absolutely love the texture created using the Little Birdie paste and how it absorbed some of the colour. 

Do leave your feedback in the comments section.

Love,
Dr. Neha Sanwalka Rungta
Crafty Flirtations 

Monday, April 9, 2018

Itsy Bitsy Little Birdie Embossing Texture Paste - Product Review

Hi Folks,

I am here with a review of Itsy Bitsy's Little Birdie's Embossing Texture Paste. Itsy Bitsy launched this paste in February 2018 during the opening of their 2nd Mumbai Store. When Rashmi Harish, owner of Itsy Bitsy showed me swatch of the Embossing Texture Paste, I knew I had to buy one.

About Embossing Texture Paste:

  • Comes in 12 amazing colours. 
  • Can be applied on various surface such as paper, metal, wood, glass etc. using a palette knife. 
  • Once you have applied the texture paste, you need to heat set it to get the crazy amazing texture. 
  • It's water resistant when dry but not washable. 
  • On heat setting, it dries to matt finish. 

Off the 12 colours, I brought the Frosty Fizz Embossing Texture Paste and here are the swatches I created to test the various effects with different mediums before I could incorporate in my project.


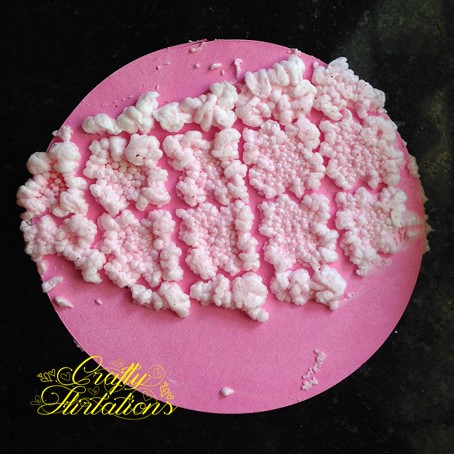
I applied Embossing Texture Paste through a stencil on Kraft Card-stock and heat set it. I absolutely love the bubbly matt finish of the paste. Would add amazing texture on any mixed media project . The more you heat the paste, the more bubbles it creates. A thicker layer of paste would give you bigger bubbles as compared to thin layer of paste (P.S. the small red dots are that of pixie red glitter that were on my stencil & got incorporate in the design).


After heat setting the Embossing Texture Paste on white Card stock, I sprayed it with Lindy's Starburst Spray Hydrangea Blue. It produced a fun shaded effect.


I blended some Distress Oxide Picked Raspberry Ink on Card stock and applied Embossing Texture Paste over it through a stencil. As Oxide inks are water reactive and stay wet longer, the paste absorbed some ink and on heat setting I got a pretty pink and white textured effect. 


I blended some Distress Ink Picked Raspberry on Card stock and applied Embossing Texture Paste over it through a stencil. Distress Inks are water reactive but dry quickly as compared to Oxides and the absorption of Ink was lesser by the paste in this case.


After Heat setting the Embossing Texture Paste on card stock blended with Picked Raspberry Distress Oxide Ink, I applied some Wilted Violet Distress Oxide Ink and sprayed it with water. The paste absorbed some of the pigment from the ink and gave an amazing purple look.


Similar effects were achieved when I applied Candied Apple Distress Ink on heat set paste and sprayed with water. Similar effect can be achieved with any dye inks. 


My Verdict:
  • The Embossing Texture Paste is a must for all Mixed-Media artists.
  • Adds amazing texture to projects. 
  • Absorbs inks from the background if the background inks are water reactive
  • If you want to retain the colour of your Embossing Texture Paste when applied on water reactive ink blended backgrounds, seal the background with mediums such as Distress Glaze or Gel Medium before applying the paste. 
  • Stains or absorbs pigments when applied on top after heat setting. 
  • At Rs. 249/- its absolutely worth the money. I am soon going to buy the rest of the shades for my mixed-media adventures. 
I had absolute fun using this product. Will soon share a Mixed-Media project where I used Embossing Texture Paste.

Hope you find the review helpful. 

Love, 
Dr. Neha Sanwalka Rungta
Crafty Flirtations 

(Disclaimer: I am not affiliated with Itsy Bitsy or Little Birdie nor have I been paid to write this review. This review is purely my personal opinion based on my experience of using this product)