Today I bring to you an experiment that I have been wanting to do for a long time & the results of which I am totally in love with. I used Mudra Daisy Bloom Layering Stamp Set. I have double heat embossed the flowers in the card below, i.e. both the yellow & red in the card below are heat embossed. Read below for instructions
Close Up Of Flower: I love how the red & yellow split and mix to form orange and give a very rustic & realistic look to the flowers
Material:
Mudra Daisy Bloom Stamp Set
Mudra Happy Birthday Sentiment Stamp Set
Watermark Versamark Ink
WOW Primary Yellow embossing powder
WOW Primary Cherry Red embossing powder
Scattered Straw Distress Ink
White Cardstock, Vellum & Ranger Heat gun
Instructions:
Stamp the 1st layer of Daisy Bloom stamp with Versamark ink, sprinkle with WOW Primary Yellow embossing powder and heat set
Stamp the 2nd layer of Daisy Bloom stamp with Versamark ink, sprinkle with WOW Primary Cherry Red embossing powder and heat set just enough to melt the red embossing powder into yellow. Be careful to not overheat
Distress edges of cardstock with scattered straw distress ink
Stamp the "Happy Birthday" sentiment on vellum with Versamark ink, sprinkle with WOW Primary Cherry Red and heat set
Put the card together and add some sequins to complete the card
Hope you all love the double heat embossed flowers on my card.
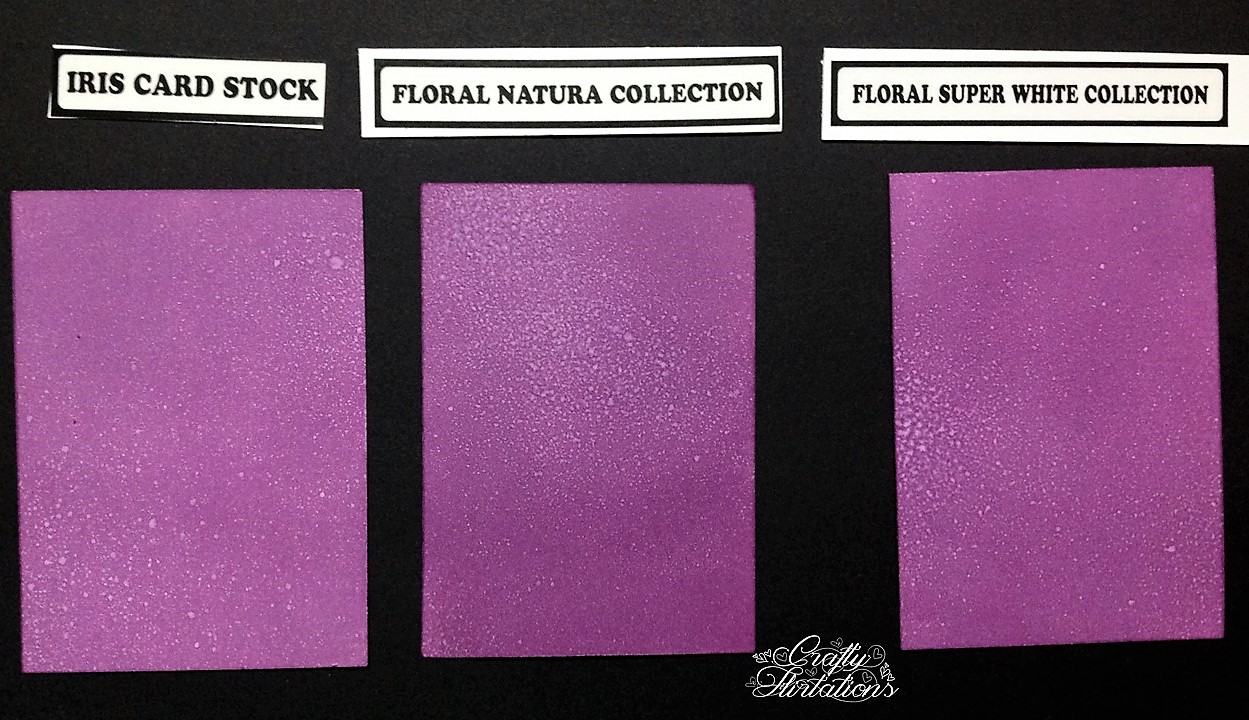
A few days back, The Craft Studio launched 2 sets of paper: Floral Natura Collection (FNC) and Floral Super White Collection (FSWC). I received a pack of sample papers from Foram Shah & Dinesh Shah of The Craft Studio.
About these papers:
Both FNC and FSWC are 270 gsm in weight. FSWC is pure white and is more whiter than Iris paper while FNC is one shade pale and has colour same as Iris paper. FNC and FSWC have good water retention ability with FSWC being able to absorb more water as compared to FNC.
Even thought these papers were launched as papers to make flower, with 270 gsm and good water absorbing properties, I decided to try them for my card backgrounds and inking techniques, heat embossing, water colouring etc. and compare it with Iris paper (as I use the same for background techniques regularly).
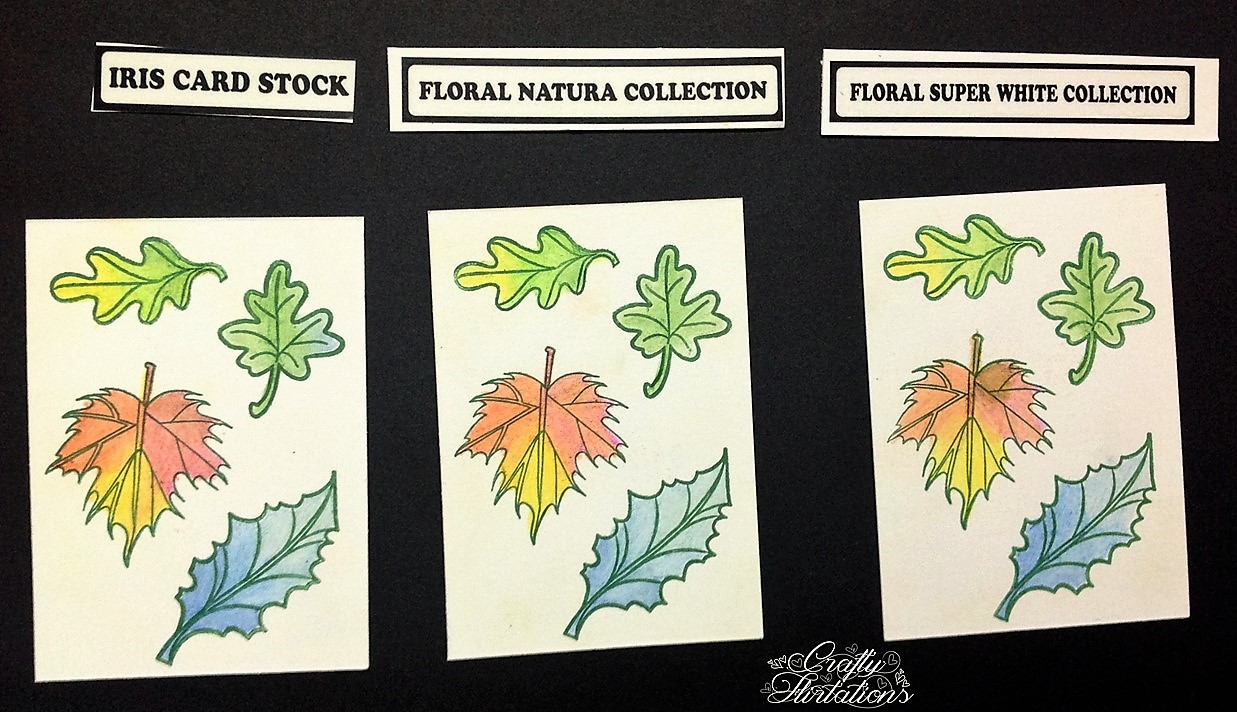
So, FNC, FSWC and Iris paper were cut to ATC size of 2.5" by 3.5" and put to test for various techniques
Test 1: Distress ink & misting. Result: My experience in Mumbai city has been that when you use distress ink on Iris paper and let it sit for some time, the distress ink goes a shade lighter. Similar results were seen on FNC & FSWC. So compares with Iris paper exactly
Test 2: Distress Ink Blending
Result: Distress Ink Blending was good on both FNC & FSWC and comparable with Iris paper. FNC overall had slightly better outcome for ink blending as compared to FSWC
Test 3: Distress ink smooshing with help of acrylic block
Result: Results were good for all 3 papers (The acrylic block I used had a grid and there were grid marks on the outcome. As you notice, grid marks are almost negligible on FSWC, which I assume are because of its high water soaking capacity. So I would choose FSWC for this technique)
Test 4: Distress ink smooshing with water mist from a craft mat
Result: Excellent for all 3 papers
Test 5: Water lifting technique
Result: Even though all 3 papers worked well for water lifting technique, FSWC performed much better than FNC for this technique. I love the outcome for water lifting on Iris and FSWC more than FNC
Test 6: Stamping with distress ink
Result: Similar effect on all 3
Test 7: Watercolour
Result:With my limited knowledge in water colouring, I tried all 3 papers for water colouring a Peony. All 3 papers worked equally well for this technique. Amongst 3, FSWC with it high water absorbing capacity worked the best for water colouring.
Test 8: Stamping with Archival inks
Results: Fantastic for all 3 papers
Test 9: Heat Embossing & Resist distress inking
Result: Excellent for all 3 papers
Test 10: Pencil colour & blending with odourless thinner
Test 11: Gelatos for background & blending with baby white
Result: Good for all 3
Test 12: Cosmic Shimmer Spray & Itsy Bitsy Splash Spray for background & Scoring
Result: To test the strength of both FNC & FSWC, I scored both the papers & neither paper tore, i.e. they scored well. Also water based spray paints like Cosmic Shimmer Spray & Itsy Bitsy Splash Spray worked well on both papers
To sum up, both papers were comparable to Iris paper for most techniques and give excellent results.
Thank you Forum & Dinesh Shah for the free samples. I loved working with both of them.
PS: I would be converting these into ATCs. So if anyone would like to swap/ trade one of these ATCs with me, please leave a comment. I am open to swapping internationally too.
Hope you all enjoyed comparison review of FNC & FSWC with Iris paper. Do leave your feedback in comments below.
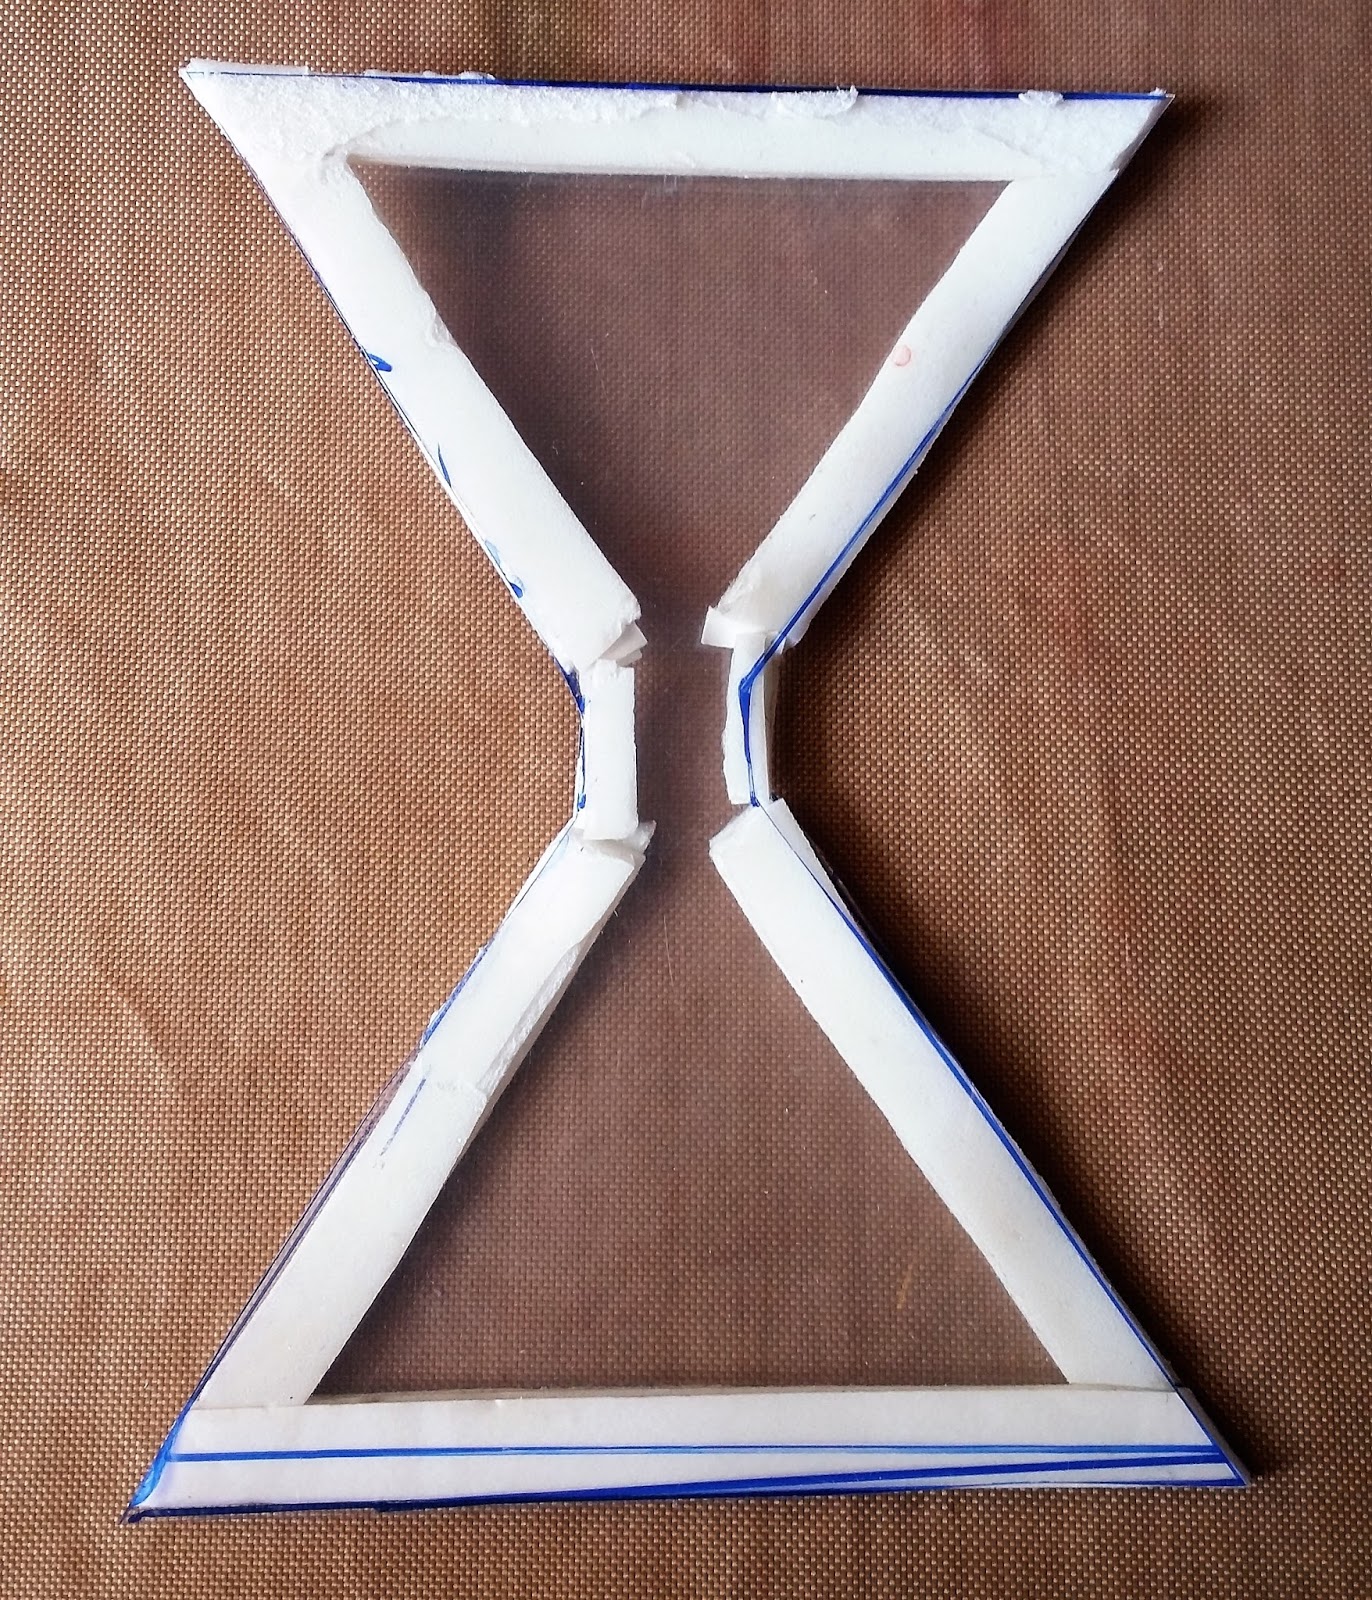
The theme for the month of February 2017 for ATC Swap at "Artist Trading Card Club India" was Shaker Cards. I dont know why, but the moment I read the theme, I knew I wanted to make a Shaker Hourglass ATC. So I gathered my supplies and got on to making this see through, dual sided ATC.
Material:
Thick OHP Sheet
1/4" double sided foam tape
Dress My Craft Sparkling Sugar
Pie Lane Chunky Glitter & Sequins
Washi Tape
Pearl Sticker strings
Yellow card stock & Sakura Micron 01
Glossy Accent
Method:
Using OHP, I drew and cut 2 identical shapes of an hourglass
Using 1/4" double sided foam tape, I adhered the 2 pieces together, making sure that I keep one side open like in the image below
Through the open side, I added Dress My Craft Sparkling dust, some chunky glitter & sequins to the shaker & once all my shaker mix was in, I stuck the open side too
I added Washi tape to the card to cover up all the foam tape & embellished it with pearl sticker strings
I wrote the sentiment on a yellow cardstock using Sakura Micron and adhered it on the edge of the ATC using Glossy Accent
I would like to share some information about Artist Trading Cards (ATCs).
Artist Trading Cards or more commonly known as ATCs are miniature pieces of arts that are created and traded by artists around the world. Artists create, trade and collect art at organised "swap" events, either in person or online. ATCs are never sold but are always traded.
ATC trade/swaps have been around for about 20 years now. The 1st ATC swap took place in 1997. In the year 1996 - 97, Swiss artist M Vanci Stirnemann, created 1200 miniature cards and exhibited them at his second-hand bookshop and gallery INK art & text in Zurich, Switzerland from 23rd April - 31st May 1997. On the last day of exhibition, he invited others to create their own cards and trade/ swap with him with the intention to allow people from different backgrounds to participate in an ongoing art project, which was not part of the art market.
A few weeks after the first ATC exhibition and trading session in Zurich, the Canadian artist Don Mabie adopted the idea and showed artist trading cards at the Alberta College of Art and Design in Calgary, Alberta, Canada. In September 1997, a trading session was organised at the New Gallery in Calgary.
(More About about history of Original ATC Trading)
Today ATCs are exchanged world over by artists either randomly or through organised swaps in person or online. ATCs are created in various medium including dry medium (pencils, pens, markers, etc.), wet media (watercolor, acrylic paints, etc.), paper media (in the form of collage, papercuts, found objects, etc.), or even metals, fiber, wax and other materials. Mixed-Media ATCs are a rage all over the world currently. When making ATCs, you dont have to follow any rule as to what medium you use except 1, i.e. for size. All ATCs have to be of the same standard miniature size of 2 1/2" and 3 1/2".
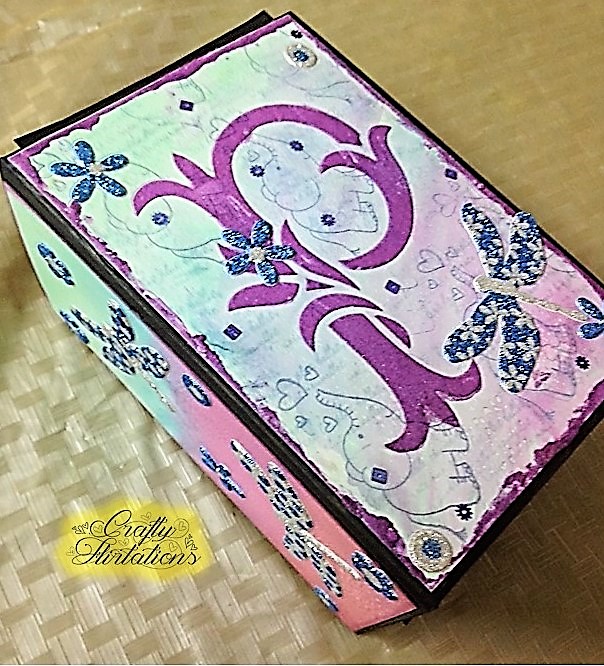
Here are some of the mixed-media ATCs I have made over last few months using various techniques such as stamping, distress inks, alcohol inks, die cuts, quilling, stickers, stencilling, mixed media etc.
Hope you all liked these ATCs. Do leave some love if you like them.
As you all know, I have joined the free 30 Day Art Journal Prompt Challenge by Allyson Bright of "Determined To Shine". The day 2 prompt of the Art Journal Class was "Letter To Me" wherein we had to write a letter to our past self either reassuring us about something or some advice. Also, we could either write a complete letter or just focus on a few words or phrases for this ART Journal Page.
I thought over this prompt for a very long time & I realised that I wouldn't like to give any advice or reassure myself about anything but would rather like to tell my past self what the future holds for me & how I should mould my life. I also decided that this page is going to serve as a boost to what I want to focus on my life from here on in future and incorporated those aspects in this letter too (except my professional life).
Story Behind The Page:
I am very lazy. So 1st and foremost I want to focus on stop being lazy & get going & be active. However, I wanted to keep the page positive overall, and hence I have not used the biggest stamp for same
I want to be able to craft & create more in as many ways as possible
My lazyness has caused me to ignore my health. I would like to get back into a better health condition, eat well & exercise
Lastly, I wanted to send myself some love & remind myself that I should always love my family & friends
Here is the page:
I created the background using Gelatos
Then using various alphabet stamps from We R Memory Keepers and Concord & 9th and sentiment stamps from Peek-a-boo & and Technique Tuesday, I stamped various words with Archival Inks or Sakura Gel Pens
I added some highlights with white gel pen to bigger size words
And then used Inkadinkado Hearts stamp & archival inks roughly stamped in any blank spaces on the page
Today I am going to share a quilling project I did way back in 2015. So why share a project from 2015?
Simply because I didnt blog back then & it is one of my most favourite quilling projects ever & involves many many techniques.
Also, I would like to blog about this as it had won place in top 5 projects back in the annual "Little Circle Annual Quilling Competition" back in 2015 which was judged by Yulia Brodskaya and I really wanted to add the project to my blog.
I have used a lot of technique in creating this centre piece including combing & honeycomb. Flowers built using quilling are Anthurium & open Lillies. Hope you enjoy this quilling piece which is very close to my heart.
Do leave some love if you liked the project. Your comments mean a lot.
Today I am sharing a simple & quick to do bookmark. I have foiled an image using Wow Bonding Powder & would recommend this as a pocket friendly method for foiling when you cant afford a foiling machine.
(I am sorry for bad image quality due to poor lighting)
Material:
Orange Cardstock
Aged Mahogany distress ink
Versamark Ink
Heartfelt daisy patch bouquet precut set
Wow bonding powder
Deco foil gold
Ranger Heat gun
Die-cut sentiment
Paper twine
Method:
Cut cardstock to size
Stamp the image from Heartfelt daisy patch set with help of Versamark ink
Sprinkle "WOW Bonding Powder and heat evenly with help of Ranger heat gun till all powder is melted
Once the powder is melted, place your deco foil on the image immediately (i.e. before the bonding powder cools down) and rub it gently using a tissue
Peel of the deco-foil to get a beautiful foiled image
Add the sentiment with help of glue
Distress the edges with Aged Mahogany Distress Ink
Punch a hole on the centre and pass paper twine through it
I am here today with a very special post. One of my close friends Hetal (I have known her for almost 16.5 years now), wanted to learn distress ink techniques for a long time. Initially we had thought we would make cards with the background we create, but her nephew turns "6 months" this month and so we decided to make 5" by 7" scrapbook instead of cards with all the distress ink techniques we do.
Her nephew's name starts from "P" and is a Leo. So we have incorporated a lot of these elements in the scrapbook. Also the little boy loves multi-colours and as he is a small kid, we decided to use different colours through the scrapbook and not just the usual shades of blues & purples that are conventionally used for boys scrapbook. Along with distress ink techniques, we also used artistry inks (Indian brand), stencil techniques, stamping, spray paints & gelatos for some of the pages in the scrapbook. Hetal picked up distress ink techniques very quickly and I am so proud of her 1st time efforts distressing & making this album. So here is presenting the scrapbook that the 2 of us built together. I have mentioned various techniques & main supplies we have used for each of pages below the images along with those used for the cover page. 270 gsm Iris Paper was used to create all Backgrounds. There is also a small video at the end to show you all the interactive elements that we had incorporated in the album.
P Stencil is from Pie Lane & Stenciled With Ranger Texture paste mixed with Pixie Glitter from Pie Lane & Lavender Acscents Spray Paint from Hampton Art. The same texture paint was applied on edges with spatula
Stamps Used: Penny Black Jumbo Love & Bo Bunny It is Written
Distress Inks For Background: Peacock Feather, Cracker Pistachio, Seedless Preserve
Distress Inks For Background: Fried Brick, Wild Honey, Peeled Paint, Rusty Hinge
Stamps: Stampendous Peony
Technique: Water Lifting
Inks For Background: Lime Kiss Artistry
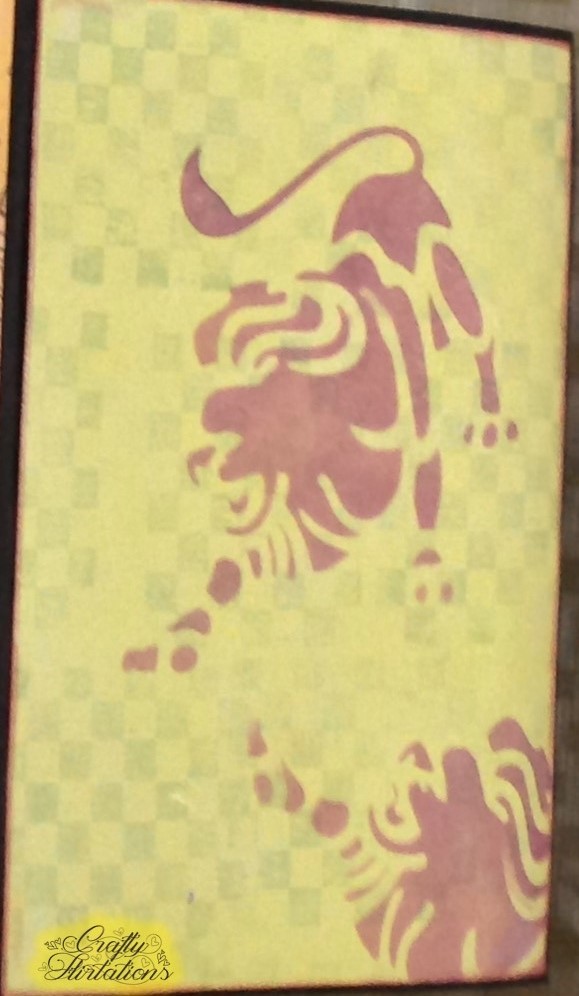
Stencil: Pie Lane Leo Stencil stenciled with Blaze Artistry Ink
Stamp: Prima Checkered Stamp
Gelatos on left background: Blueberry, Boysenberry, Cotton Candy, Grape Grape
Gelatos on right background: Pistachio, Green Tea, Lime Lime, Spearmint
Technique: Drip technique
Inks Used For Background: Artistry Blaze & Distress Peacock Feather
Stamp Used: Scrapberry Kids Fun Happy Birthday
Ink for background: Distress Seedless Preserves & Artsitry Lavedner
Whimsy Holly
Ink For Background: Artistry Blaze
Technique on background: Stamping with pearlised water
Gelatos on left: Blueberry, Boysenberry, Cotton Candy, Grape Grape
Stamp Used: Scrapberry Mother's Treasure First Smile
Distress Inks on Left Page: Cracked Pistachio, Seedless Preserve, Peacock Feather, Pine needles
Stamp used: Itsy Bitsy Fazzy Blutterly
Technique Used: Resist technique using Clear embossing powder
Distress ink on Left: Seedless preserve & Faded Jeans
Stamp Used: Lawn Fawn Whale You Be Mine
Inks for background: Distress Dried Marigold, Distress Stormy Sky, Artistry Moon Crate, Artistry Lime Kiss
Stamp: Lawn Fawn Pa Rum Pa Pum Pum
Artistry Inks Used For Background: Blaze, Orange Popsicle & Lime Kiss
Technique: Resist technique using white embossing power
Artistry Inks Used For Background: Blaze, Orange Popsicle & Lime Kiss
Technique: Resist technique using Versamark Ink
Background w as done using distress ink smoosh technqiue
Stamp: We R Memory Keepers P alphabet and stamped using gelatos
Also used Bo Bunny It is Written Stamp
Inks for background: Lime Kiss Artistry, Artistry Dark Garnet & Peeled Paint Distress Ink
Techniques: Applied Artistry Dark Garnet & Peeled Paint Distress Ink on bubble wrap paper and stamped on Iris Paper. We then Spritzed it with pearlized water and allowed artistry & distress colours to bleed and blend. Then we applied Lime Kiss artistry colour on top to blend and bring it all together.
Stamp used: Kaiser craft wood grain & Scrapberry kids fun happy birthday stamp
Stamp used: Kaiser craft wood grain & Scrapberry kids fun happy birthday stamp
Here is a small interactive video:
Hope You All Liked The Beautiful Scrapbook We Both Made