Showing posts with label Review. Show all posts

Wednesday, June 13, 2018

Litlle Birdie Mixed Media Journal Review + 2 Journal pages

Hi all,

During Creativation 2018 in January, the one and only product that caught my fancy was Little Birdie Art and Mixed Media Journal. If you have been following my work, you already know how crazy I am about Art Journals, however no good hard bound journals were available until now in India. Hence, when I saw the upcoming release during Creativation, I immediately inboxed Rashmi Harish, owner of Itsy Bitsy & Little Birdie to congratulate her for coming up with the journals. To my absolute delight, Rashmi promised to send me one of the journals when the actual production starts and as soon as the journals were released in June, I had the Mixed Media Journal come my way (another surprise that Rashmi actually remembered to send me a journal after 5 months & I am touched by the gesture). Thanks Rashmi.

Now lets come to these journals. There are 3 journals - Art Journal in 220 & 440 gsm & Mixed Media Journal and they come in 2 sizes: 5.5 by 7.5" and 7.6 by 10.2". You can read all about Art Journal here. I am going to review the Mixed Media Journal which Rashmi very sweetly sent me.


Features of the journal:

  • Made in India 
  • Contains 92 pages that you could work on
  • Has 16 Canvas, corrugated, white burlap, natural burlap and handmade paper each
  • Has 12 Kraft cardstock
  • Its hardbound & 100% cold pressed 
  • Its handmade and archival 
  • Very very cost effective (Rs. 999/- or about 15$ when purchasing in India. For price in US and other countries, please hop on to the Little Birdie Website)
I got the journal on Saturday and I already have made 2 journal pages. 

Page 1: 
The 1st page in the journal is a canvas. Being a fan of embroidery, I decided to embroider a rose in the journal & stamp my name. I decided to keep it simple as I wanted to focus on the rose. 

Embroidery on canvas page in Mixed Media Journal By Little Birdie
Steps to create: 
  • I stamped the image from Stampendous Fran's Cling Stamp & Stencil Set - Build A Bouquet Set on canvas using Catherine Pooler Die Ink. 
  • Once the ink was dry, I embroidered the flowers using Anchor floss (3 strings). 
  • For the flower I used normal filling stitch and did leaves using chain stitch. 
  • While I was embroidering, the edges started fraying a little and hence, I sealed the stitches using blanket stitch. 
  • As it was impossible to use an embroidery hop in the journal, the canvas wrapped a little in the process, however, I absolutely the wrapped look. 
  • To finish the page, I stamped my name using the Concord & 9th Script Stamp and Dye inks. 

Close up of rose

Page 2:

For the backside of the canvas, as you can imagine, all the knots and embroidery backing was visible & being the crazy me, I wanted to hide it all so that when I flip the page, I see a beautiful layout & not all the crazy knots. Hence, I created a page separately on a vellum  and adhered it to the backside of the canvas. I like how the blanket stitch is peeping from sides of the vellum.. Gives a very rustic look. 


Steps to create:
  • I stamped as image from Clearly Besotted Thanks a Bunch set using Ranger Archival black ink on Brustro Watercolor paper. 
  • I coloured the image using Peerless watercolors & fussy cut it. 
  • I coloured a 5 by 7" vellum sheet using Ranger Alcohol inks: Lettuce, Butterscotch and silver. 
  • Then I adhered the vellum at the back of the canvas using Range Glossy Accent. 
  • To finish the page, I adhered the coloured image & printed quote using glue. 

I hope you love these simple, yet fun mixed media art journal pages. If you love Art Journalling and if you want t o challenge yourself to create art journal spreads on various textured backgrounds, Little Birdie Mixed Media Journal is a must buy. I shall be back soon with more pages in this amazing Mixed Media journal. 

I would once again like to thank Rashmi for sending this amazing journal. 

Love, 
Dr. Neha Sanwalka Rungta 


Monday, April 9, 2018

Itsy Bitsy Little Birdie Embossing Texture Paste - Product Review

Hi Folks,

I am here with a review of Itsy Bitsy's Little Birdie's Embossing Texture Paste. Itsy Bitsy launched this paste in February 2018 during the opening of their 2nd Mumbai Store. When Rashmi Harish, owner of Itsy Bitsy showed me swatch of the Embossing Texture Paste, I knew I had to buy one.

About Embossing Texture Paste:

  • Comes in 12 amazing colours. 
  • Can be applied on various surface such as paper, metal, wood, glass etc. using a palette knife. 
  • Once you have applied the texture paste, you need to heat set it to get the crazy amazing texture. 
  • It's water resistant when dry but not washable. 
  • On heat setting, it dries to matt finish. 

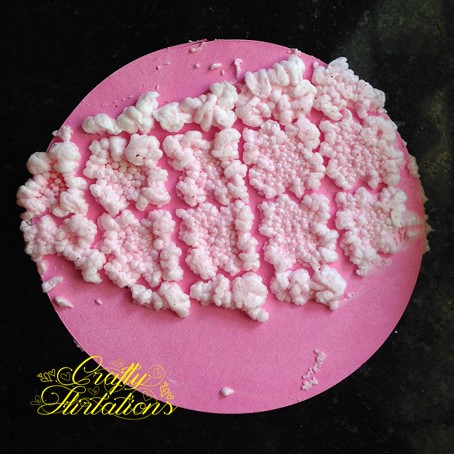
Off the 12 colours, I brought the Frosty Fizz Embossing Texture Paste and here are the swatches I created to test the various effects with different mediums before I could incorporate in my project.


I applied Embossing Texture Paste through a stencil on Kraft Card-stock and heat set it. I absolutely love the bubbly matt finish of the paste. Would add amazing texture on any mixed media project . The more you heat the paste, the more bubbles it creates. A thicker layer of paste would give you bigger bubbles as compared to thin layer of paste (P.S. the small red dots are that of pixie red glitter that were on my stencil & got incorporate in the design).


After heat setting the Embossing Texture Paste on white Card stock, I sprayed it with Lindy's Starburst Spray Hydrangea Blue. It produced a fun shaded effect.


I blended some Distress Oxide Picked Raspberry Ink on Card stock and applied Embossing Texture Paste over it through a stencil. As Oxide inks are water reactive and stay wet longer, the paste absorbed some ink and on heat setting I got a pretty pink and white textured effect. 


I blended some Distress Ink Picked Raspberry on Card stock and applied Embossing Texture Paste over it through a stencil. Distress Inks are water reactive but dry quickly as compared to Oxides and the absorption of Ink was lesser by the paste in this case.


After Heat setting the Embossing Texture Paste on card stock blended with Picked Raspberry Distress Oxide Ink, I applied some Wilted Violet Distress Oxide Ink and sprayed it with water. The paste absorbed some of the pigment from the ink and gave an amazing purple look.


Similar effects were achieved when I applied Candied Apple Distress Ink on heat set paste and sprayed with water. Similar effect can be achieved with any dye inks. 


My Verdict:
  • The Embossing Texture Paste is a must for all Mixed-Media artists.
  • Adds amazing texture to projects. 
  • Absorbs inks from the background if the background inks are water reactive
  • If you want to retain the colour of your Embossing Texture Paste when applied on water reactive ink blended backgrounds, seal the background with mediums such as Distress Glaze or Gel Medium before applying the paste. 
  • Stains or absorbs pigments when applied on top after heat setting. 
  • At Rs. 249/- its absolutely worth the money. I am soon going to buy the rest of the shades for my mixed-media adventures. 
I had absolute fun using this product. Will soon share a Mixed-Media project where I used Embossing Texture Paste.

Hope you find the review helpful. 

Love, 
Dr. Neha Sanwalka Rungta
Crafty Flirtations 

(Disclaimer: I am not affiliated with Itsy Bitsy or Little Birdie nor have I been paid to write this review. This review is purely my personal opinion based on my experience of using this product) 


Thursday, February 16, 2017

Lets Get Inky - Paper comparisons

Hi Friends,

A few days back, The Craft Studio launched 2 sets of paper: Floral Natura Collection (FNC) and Floral Super White Collection (FSWC). I received a pack of sample papers from Foram Shah & Dinesh Shah of The Craft Studio.

About these papers: 
Both FNC and FSWC are 270 gsm in weight. FSWC is pure white and is more whiter than Iris paper while FNC is one shade pale and has colour same as Iris paper. FNC and FSWC have good water retention ability with FSWC being able to absorb more water as compared to FNC.

Even thought these papers were launched as papers to make flower, with 270 gsm and good water absorbing properties, I decided to try them for my card backgrounds and inking techniques, heat embossing, water colouring etc. and compare it with Iris paper (as I use the same for background techniques regularly).

So, FNC, FSWC and Iris paper were cut to ATC size of 2.5" by 3.5" and put to test for various techniques

Test 1: Distress ink & misting.
Result: My experience in Mumbai city has been that when you use distress ink on Iris paper and let it sit for some time, the distress ink goes a shade lighter. Similar results were seen on FNC & FSWC. So compares with Iris paper exactly


Test 2: Distress Ink Blending
Result: Distress Ink Blending was good on both FNC & FSWC and comparable with Iris paper. FNC overall had slightly better outcome for ink blending as compared to FSWC


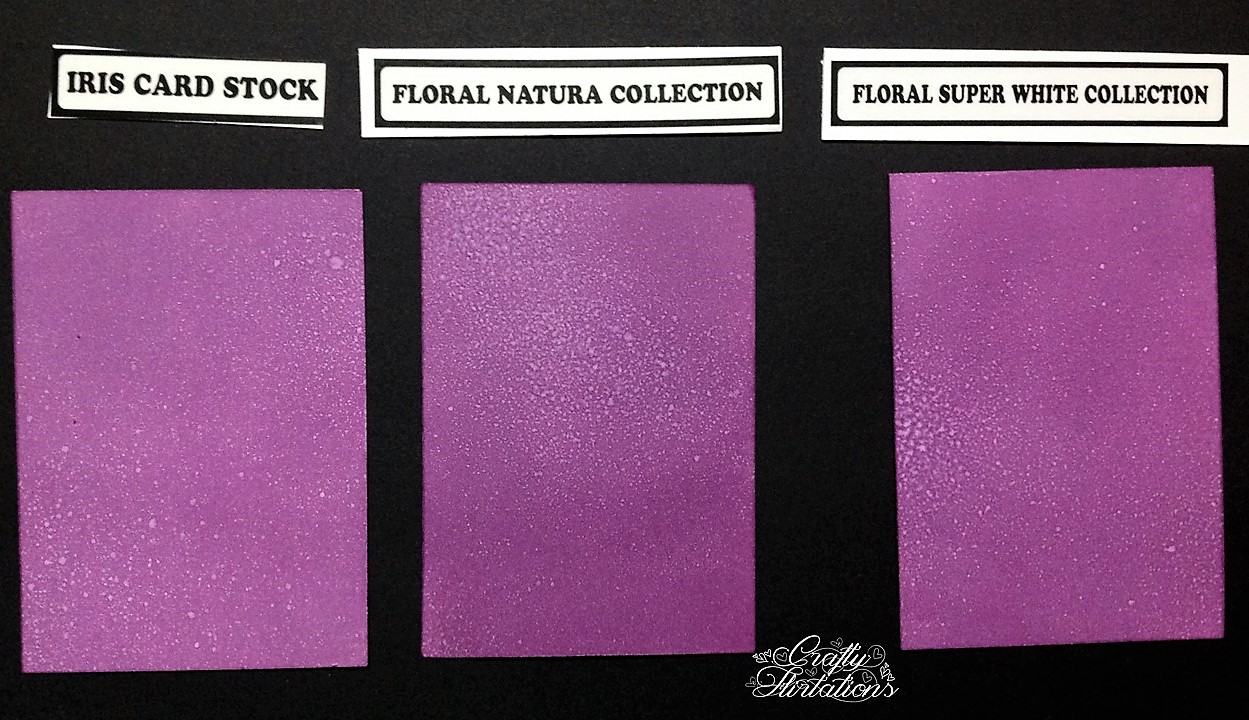
Test 3: Distress ink  smooshing with help of acrylic block
Result: Results were good for all 3 papers (The acrylic block I used had a grid and there were grid marks on the outcome. As you notice, grid marks are almost negligible on FSWC, which I assume are because of its high water soaking capacity. So I would choose FSWC for this technique)


Test 4: Distress ink smooshing with water mist from a craft mat
Result: Excellent for all 3 papers


Test 5: Water lifting technique
Result: Even though all 3 papers worked well for water lifting technique, FSWC performed much better than FNC for this technique. I love the outcome for water lifting on Iris and FSWC more than FNC


Test 6: Stamping with distress ink
Result: Similar effect on all 3


Test 7: Watercolour 
Result: With my limited knowledge in water colouring, I tried all 3 papers for water colouring a Peony. All 3 papers worked equally well for this technique. Amongst 3, FSWC with it high water absorbing capacity worked the best for water colouring.


Test 8: Stamping with Archival inks
Results: Fantastic for all 3 papers


Test 9: Heat Embossing & Resist distress inking
Result: Excellent for all 3 papers


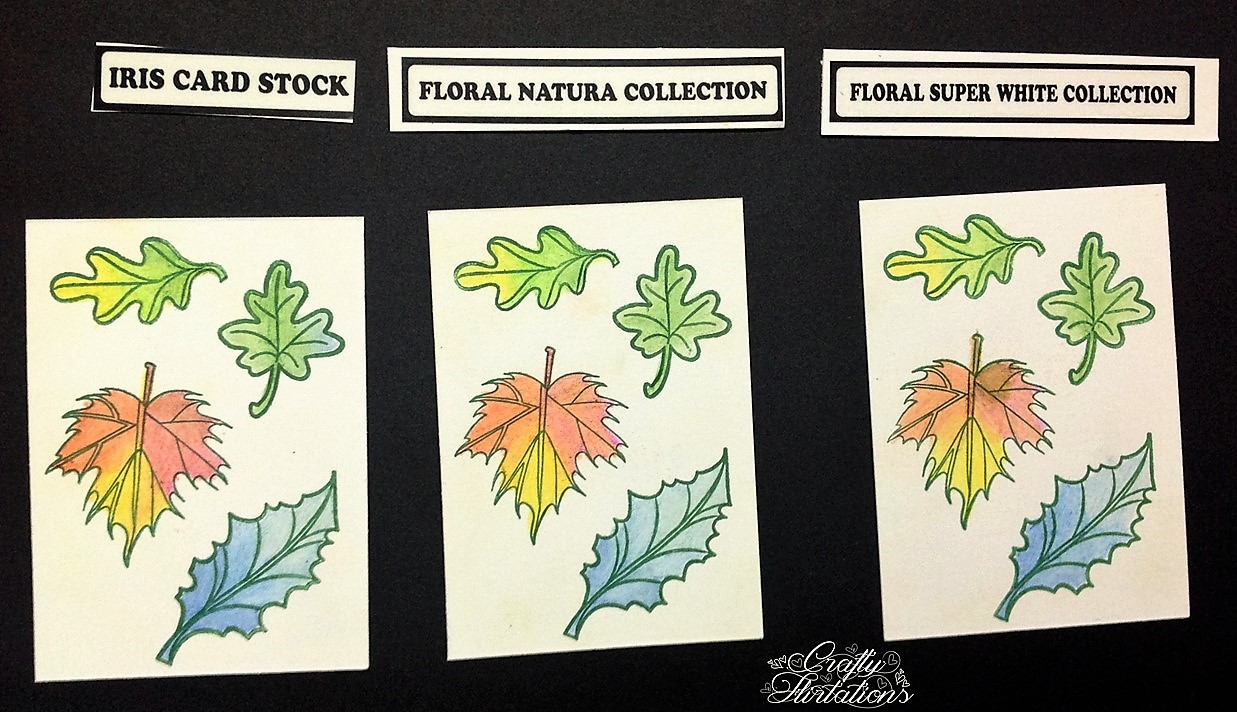
Test 10: Pencil colour & blending with odourless thinner


Test 11: Gelatos for background & blending with baby white
Result: Good for all 3


Test 12: Cosmic Shimmer Spray & Itsy Bitsy Splash Spray for background & Scoring
Result: To test the strength of both FNC & FSWC, I scored both the papers & neither paper tore, i.e. they scored well. Also water based spray paints like Cosmic Shimmer Spray & Itsy Bitsy Splash Spray worked well on both papers 


To sum up, both papers were comparable to Iris paper for most techniques and give excellent results. 

Thank you Forum & Dinesh Shah for the free samples. I loved working with both of them. 

PS: I would be converting these into ATCs. So if anyone would like to swap/ trade one of these ATCs with me, please leave a comment. I am open to swapping internationally too. 

Hope you all enjoyed comparison review of FNC & FSWC with Iris paper. Do leave your feedback in comments below. 

Love,
Dr. Neha Sanwalka
Crafty Flirtations


Tuesday, May 17, 2016

Monochromatic Stamping With Embossing Card

Hello all,

You know destiny wants you to make cards when you watch a video on Monochromatic Stamping by Jennifer McGuire and at the same time you receive free samples of some gorgeous card stock from the beautiful and lovely Maninder Kaur of Rainbow Craftykari :)

So I got this beautiful sample of "Lightly Textured Coloured Card Stock" in red, blue and orange. So despite statistical analysis (what I do professionally), I had to steal time away to make some cards :)

Lightly Textured Coloured Card stock
The card stock has light chequered texture on one side and fairly smooth (though not completely) on the other. To highlight the two sides of the card, I have created 4 different cards (2 red and 2 blue) by stamping on both sides of the card-stock.

Red Card Base: 

I stamped the the solid flower from Prima "Ink N Layer" glorious flora using archival carnation red ink pad on the red card-stock. For the 2nd layer of stamping, I used Versamark ink pad and Zing clear embossing powder and heat set the image. In the images below, you can see the difference in the texture of stamping on the 2 sides of the card stock

Chequered Side and the stamping is chequered too


Smooth side and smooth stamping 


Blue Card Base: 

I stamped the the solid flower from Prima "Ink N Layer" glorious flora using archival cobalt blue ink pad on the red card-stock. This time for  the 2nd layer of stamping, I used Versamark ink pad and Zing white embossing powder and heat set the image. Like in red card base, in the images below, you can see the difference in the texture of stamping on the 2 sides of the card stock

Chequered Side and the stamping is chequered too

Smooth side and smooth stamping 

I personally loved both the effects, especially the chequered side as it adds a lot of depth to the card  base :)

To finish off the card:

I adhered the card bases created above on white card stock with help of red-tacky tape. For sentiment, I used Kaisercraft Wishes Mini Stamp and stamped "Best Wishes" on Vellum using "Archival Black Ink Pad". Using glue I adhered the vellum on the card-stock by applying very small glue dots behind the stamped area :)


Hope you liked the cards and my take on the card :) If you like, you could order the cards stock by contacting Maninder Kaur or from Rainbow Craftykari  I have listed the complete supply of products used to make the cards below :)

List of Supplies Used:

  • Prima Ink N Layer glorious flora  Stamp
  • Kaisercraft Wishes Mini Stamp
  • Red lightly textured coloured card stock 
  • Blue lightly textured coloured card stock  
  • Archival Carnation Red Ink Pad
  • Archival Cobalt Blue Ink Pad
  • Archival Black Ink Pad
  • Versamark Ink Pad
  • Zing Clear Embossing Powder
  • Zing White Embossing Powder
  • Acrylic Block
  • Stamping Foam 
  • Ranger Heat Gun
  • White Card Stock
  • Vellum
  • Red-tacky tape
  • Fevicryl glue 


Thanks for stopping by.

Love,
Dr. Neha Sanwalka
Crafty Flirtations :)