Showing posts with label Floral Natura Collection - The Craft Studio. Show all posts

Tuesday, July 10, 2018

Tulips -Becoming Awake Art Journal Page

Hi friends,

I am back with another page from the art journal I made for my friend Tejal. When I started creating this page, all I knew was that I wanted to use white tulips as focal point on this page as they are an absolute favorite of Saumya. Before I went ahead and used tulips, I decided to read a little history about Tulips.

Tulips - Becoming Awake Involves Seeing Our Confusions Clearly Art Journal Page

Did you know that tulips are one of the most loved flowers world over. They originated centuries ago in Persia and Turkey and were brought to Europe from there. They got the name Tulip in Europe from the word "Tulipa" which meant turban. Tulip in general signifies perfect love. However, each color of tulip signifies a special meaning. So what does white tulip signify?

  • White tulips represent forgiveness.
  • They represent pure and passionate love. 
  • It is associated with happiness and love. 
  • It also often associated with the word "victory".
  • They also signify purity and innocence.


Tulips - Becoming Awake Involves Seeing Our Confusions Clearly Art Journal Page

Isn't that beautiful how many varied emotions the lovely tulips represent? As the focal point of this page was going to be white tulips, I decided to use bright colors for the background and yet keep it simple as I wanted to the focus to be on tulips and quotes (which again was one of Saumya's favorite).


Tulips - Becoming Awake Involves Seeing Our Confusions Clearly Art Journal Page

Supplies Used:

Tulips - Becoming Awake Involves Seeing Our Confusions Clearly Art Journal Page

Steps to create:

  • Color the card stock/ chipboard base with Dirty Martini paint using blending foam. 
  • Once dry, apply After Midnight paint through CrafTangles stencil using blending foam.
  • Apply texture paste through iCraft stencil.
  • Stamp multiple images of tulips on white cardstock and fussy cut. 
  • Add very light shading to tulips using grey watercolor pencil and color the stem with paint pen. 
  • Paper piece the image to create dimensional tulips using foam tapes.
  • To finish the page, adhere tulips and quote to page using glue. 

Tulips - Becoming Awake Involves Seeing Our Confusions Clearly Art Journal Page
You can view other pages by clicking on captions on pics below.

Page 1

Page 2

Page 3

Page 4

Page 5


Hope you love this page. Do leave some love & feedback.

Love,
Dr. Neha Sanwalka Rungta,
Crafty Flirtations.

PS. The blog contains some affiliate links without any extra cost to you.

Monday, May 21, 2018

A Feathery Great Day

Hey Friends,

I am back with a neat and clean card today.


Supplies:
  • iCraft Floral Natura card stock 
  • Die Versions A Great Day die
  • Spellbinders Die - Feathers
  • Ranger Distress Oxide Ink: Spiced Marmalade
  • Ranger Distress Ink: Candied Apple
  • Nuvo Mousse Fresh Copper
  • Foam tape, glue, water mister, heat gun 
Steps to create:

  • Cut and score Natura paper to create 4.5 by 5.25" side folding card base.
  • Smoosh Distress ink and Oxide ink on craft mat, mist with water, place white card stock on the ink to colour it and dry using heat gun. Repeat the layer till desired colour is achieved. 
  • Once the desired colour is achieved, die cut "A Great Day" and some feathers from it.
  • Die cut 2 "A great day" sentiment from white card stock and stack and adhere on top of each other. Adhere the coloured "a great day" on top of stacked white die cut.
  • Adhere the sentiment to card base using glue. 
  • Rub & buff some Nuvo mousse on feathers. Arrange and adhere feathers on card base to finish the card (adhere 2 feathers using foam tape for added dimension). 
Hope you liked this card.

Love,
Dr. Neha Sanwalka Rungta
Crafty Flirtations 

Monday, May 14, 2018

Quick card using Mayura Collection Paper

Hi Friends,

The Craft Studio launched their 1st paper pack "Mayura Collection" under their brand name "iCraft" a few weeks back. Dinesh & Forum very kindly sent me a complementary pack of the papers to try. 

About Mayura Collection:
  • This pack comes in 12 by 12" size
  • Has 30 printed sheet
  • 4 of these sheets are UV Embossed, Textured Embossed, Foiled and Matt laminated
  • The pack also includes 4 motif sheets, 1 sheet of quotes and 1 envelope template 
  • They are ideal for making cards & Scrapbooks
The motif and quotes sheet make it so ease to whip up cards in no time. Sharing with you a card that I made in less than half an hour (only cause it involved fussy cutting). 


    Supplies:
    • iCraft Floral Natura Paper
    • iCraft Mayura Collection Pattern paper
    • Scissor, foam tape, glue, embossing tool 

    Steps to create:
    • Cut and score Natura paper to create 4.5 by 5.25" top folding card base.
    • Cut one of the pattern papers to 4.25 by 5" size and adhere on top of card base with glue. 
    • Fussy cut 2 floral motifs from motif sheet. Shape one of them using embossing tool and adhere on top of the other using foam tape for dimension.
    • To finish the card, adhere the motif (using glue) & quote (using foam tape) on the prepared card base.  
    Hope you like this quick card.

    Love, 
    Dr. Neha Sanwalka Rungta
    Crafty Flirtations 

    Saturday, December 16, 2017

    It's The Seasons To Be Jolly - Art Journal

    Hi Friends,

    Art journal for me is not just a way of expressing my thoughts, feelings, moods but its also about trying different techniques that I have been meaning to try for a long time. As Christmas is around the corner, I made an art journal page with Ornaments as my focal points and used a few different techniques to create my focal points.


    Supplies used:
    • Ranger Distress Ink: Cracked Pistachio, Candied Apple, Wild Honey
    • Cosmic Shimmer Mist: Meadow Lush, Blue Lime
    • Ranger Archival Ink: Red Geranium, Jet Black
    • VersaMark Ink 
    • Art Anthology Dimensional Medium - Brick (Stone Effect)
    • iCraft Stencils
    • iCraft Floral Natura Paper Card stock 
    • Snowflakes Stamp
    • Concord & 9th: Sophisticated Script Stamp Set
    • Ranger Clear Ultra-thick Embossing Enamel (UTEE)
    • WOW Cherry Red Embossing Powder
    • Ranger Glossy Accent 
    • Rhinestones, palate knife, foam tape, yellow floss, circle cutter, heat tool  

    Steps to Create:
    Background: 
    • Blend Cracked Pistachio ink on the art journal.
    • Stamp snowflakes stamp (2nd generation stamping) using Red Geranium Ink.
    • Spray the cosmic shimmer sprays at a close distance on random spots and let it dry .
    Pre-preparation for ornaments:
    • Cut 2" diameter circle from white card stock using circle cutter or a die (6 in number).
    • Blend Wild Honey ink on the cut circles.
    • Cut small small squares from card stock and colour using Candied Apple Ink.


    1st Ornament from Left:
    • Blend Candied Apple Ink on the prepared ornament through iCraft circle cluster Stencil.
    • Once the ink is dry, apply Glossy Accent on each of the circles and keep it aside for drying. 
    2nd Ornament from Left:
    • Blend Candied Apple Ink on the prepared ornament through iCraft Stencil. 
    • Once the ink is dry, apply a layer of Glossy Accent on the full circle.
    • Once dry, reapply a second coat of Glassy Accent and keep it aside for drying.

    Centre Ornament:
    • Rub VersaMark Ink on the prepared ornament and sprinkle UTEE and heat set.
    • Once the UTEE is evenly melted and hot, sprinkle another layer of UTEE and heat set again.
    • Repeat the process 3-4 times to get a thick layer.
    • Once happy with the thickness of the enamel, randomly sprinkle some Cherry Red embossing powder and heat set and while the entire enamel layer is still hot, stamp on it with Snowflakes stamp to give an embossed effect (Rubber stamps work the best for this technique and before stamping on hot layer of enamel, apply VersaMark Ink on the stamp to prevent any damage from Enamel).

    4th Ornament from left
    • Simply stamp some snowflakes on prepared ornament and heat set with Cherry Red Embossing powder.

    5th Ornament from left
    • Apply a generous layer of stone effect Art Anthology Brick Dimensional paste through iCraft stencil on the prepared ornament and let it dry.
    Last Ornament:

    • Splatter few drops of watered-down Candied Apple Ink on the ornament & embellish with a few rhinestones.
    To finish all the ornaments:
    • Adhere the coloured red squares and floss on the ornaments to complete them.
    Finishing the Art Journal page: 
    • Arrange and mark placement for your ornaments on the page.
    • Using some water-down Candied Apple ink, create a shadow effect on the outer ends of markings (as the Candied Apple ink re-activates some of the green inks on backgrounds, it creates a subtle shadow for ornaments.
    • Once the ink is dry, adhere the ornament  to the page with foam tape and give an uneven outline to the page with colour of your choice.
    • Adhere the extra floss on the backside with glue.
    • To finish, stamp the sentiment using Jet Black Ink and Sophisticated Script Stamp Set.

    I hope you enjoyed reading about my Art Journal Page. 

    Wish you a Merry & Bright Christmas :) 

    Love,
    Dr. Neha Sanwalka Rungta
    Crafty Flirtations 

    Thursday, February 16, 2017

    Lets Get Inky - Paper comparisons

    Hi Friends,

    A few days back, The Craft Studio launched 2 sets of paper: Floral Natura Collection (FNC) and Floral Super White Collection (FSWC). I received a pack of sample papers from Foram Shah & Dinesh Shah of The Craft Studio.

    About these papers: 
    Both FNC and FSWC are 270 gsm in weight. FSWC is pure white and is more whiter than Iris paper while FNC is one shade pale and has colour same as Iris paper. FNC and FSWC have good water retention ability with FSWC being able to absorb more water as compared to FNC.

    Even thought these papers were launched as papers to make flower, with 270 gsm and good water absorbing properties, I decided to try them for my card backgrounds and inking techniques, heat embossing, water colouring etc. and compare it with Iris paper (as I use the same for background techniques regularly).

    So, FNC, FSWC and Iris paper were cut to ATC size of 2.5" by 3.5" and put to test for various techniques

    Test 1: Distress ink & misting.
    Result: My experience in Mumbai city has been that when you use distress ink on Iris paper and let it sit for some time, the distress ink goes a shade lighter. Similar results were seen on FNC & FSWC. So compares with Iris paper exactly


    Test 2: Distress Ink Blending
    Result: Distress Ink Blending was good on both FNC & FSWC and comparable with Iris paper. FNC overall had slightly better outcome for ink blending as compared to FSWC


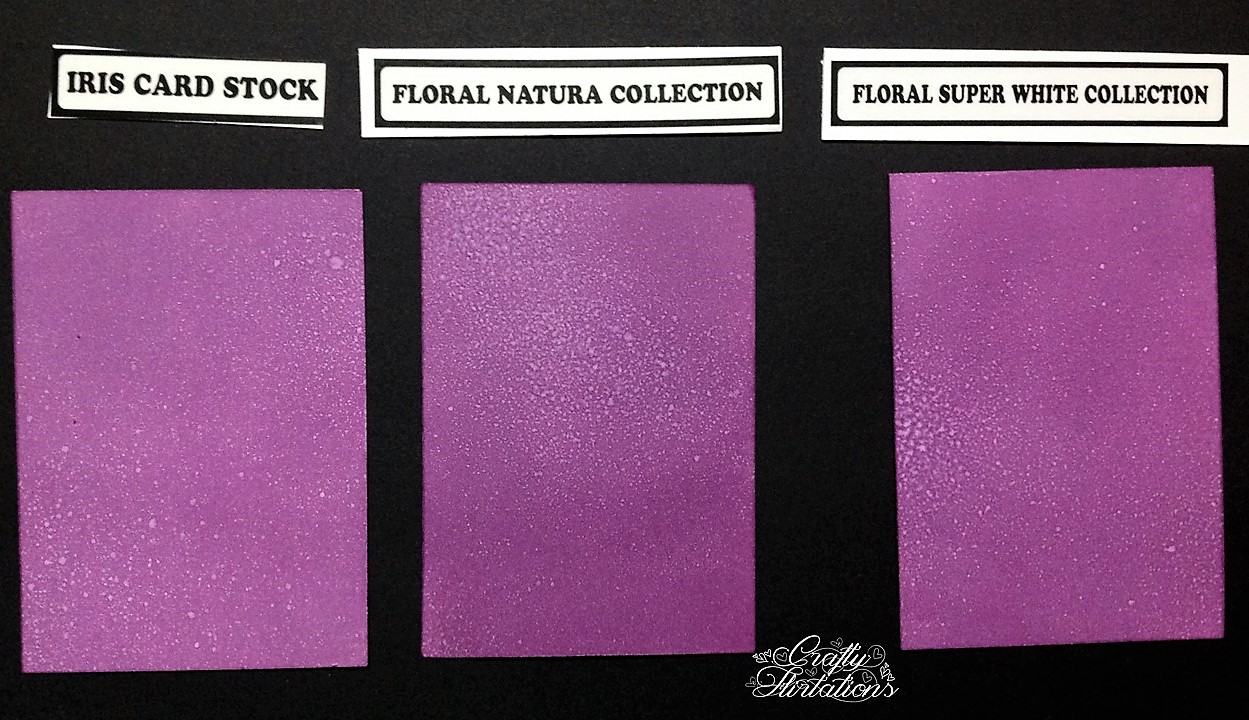
    Test 3: Distress ink  smooshing with help of acrylic block
    Result: Results were good for all 3 papers (The acrylic block I used had a grid and there were grid marks on the outcome. As you notice, grid marks are almost negligible on FSWC, which I assume are because of its high water soaking capacity. So I would choose FSWC for this technique)


    Test 4: Distress ink smooshing with water mist from a craft mat
    Result: Excellent for all 3 papers


    Test 5: Water lifting technique
    Result: Even though all 3 papers worked well for water lifting technique, FSWC performed much better than FNC for this technique. I love the outcome for water lifting on Iris and FSWC more than FNC


    Test 6: Stamping with distress ink
    Result: Similar effect on all 3


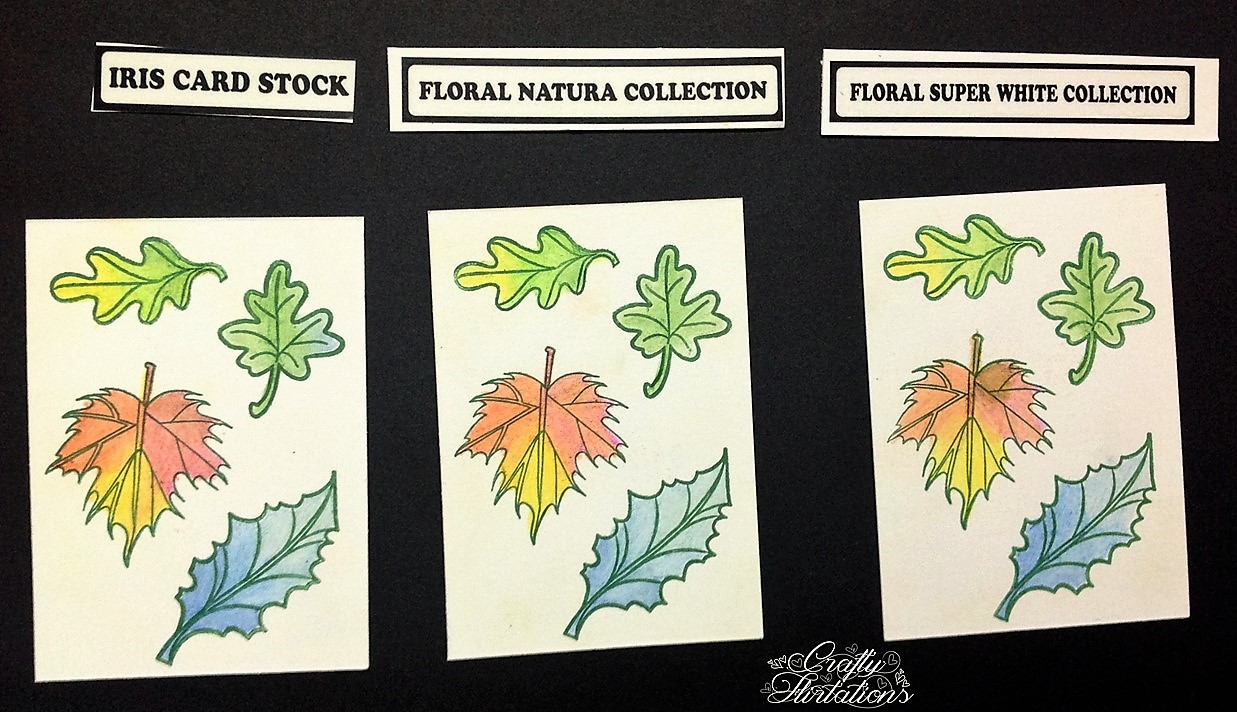
    Test 7: Watercolour 
    Result: With my limited knowledge in water colouring, I tried all 3 papers for water colouring a Peony. All 3 papers worked equally well for this technique. Amongst 3, FSWC with it high water absorbing capacity worked the best for water colouring.


    Test 8: Stamping with Archival inks
    Results: Fantastic for all 3 papers


    Test 9: Heat Embossing & Resist distress inking
    Result: Excellent for all 3 papers


    Test 10: Pencil colour & blending with odourless thinner


    Test 11: Gelatos for background & blending with baby white
    Result: Good for all 3


    Test 12: Cosmic Shimmer Spray & Itsy Bitsy Splash Spray for background & Scoring
    Result: To test the strength of both FNC & FSWC, I scored both the papers & neither paper tore, i.e. they scored well. Also water based spray paints like Cosmic Shimmer Spray & Itsy Bitsy Splash Spray worked well on both papers 


    To sum up, both papers were comparable to Iris paper for most techniques and give excellent results. 

    Thank you Forum & Dinesh Shah for the free samples. I loved working with both of them. 

    PS: I would be converting these into ATCs. So if anyone would like to swap/ trade one of these ATCs with me, please leave a comment. I am open to swapping internationally too. 

    Hope you all enjoyed comparison review of FNC & FSWC with Iris paper. Do leave your feedback in comments below. 

    Love,
    Dr. Neha Sanwalka
    Crafty Flirtations