Showing posts with label Distress Ink. Show all posts

Tuesday, April 2, 2019

Create Wings - Art Journal - #TTC10

Hi friends,

Welcome back after a months time. Well I have been excessively busy the last month with work commitments but as we start a new challenge at The Twisted Challenges today, I decided to take a break for sometime to create the inspiration. The theme this month is "Animals + Wings", i.e you need to use an animal image and add wings to the animal.You have to use animals that do not have wings and add wings to them.



As usual, I have created an art journal page for the inspiration. I used minimal products for this page and is very easy to create.

Create Wings - Art Journal - TTC#10

Create Wings - Art Journal - TTC#10

Create Wings - Art Journal - TTC#10 
Create Wings - Art Journal - TTC#10


  • I colored a page in Little Birdie Mixed Media Journal using Ranger Candied Apple Distress Ink.
  • Using a tree stencil from icraft, I applied Nuvo Silver Mousse on the page.
  • I pencil colored some animal digital stamps from http://www.opalmanor.com/digistamps and fussy cut them.
  • The wings were die cut using various butterfly dies.
  • The wings and animals were adhered on the page using glue.
  • Quote was added to the page to finish the page.
I hope you all loved this quick, simple and bright page and are inspired to add wings to your life to achieve something spectacular in life. Hop on to The Twisted Challenges blog to know more about the challenge rules and to see more inspiration from the team. 

Love,
Dr. Neha Sanwalka Rungta
Crafty Flirtations 
The Twisted Challenges 

Friday, March 1, 2019

Soldiers Are True Heroes - Art Journal - #TTC9

Hi Friends,

Its a new month and a new challenge at The Twisted Challenges. #TTC9 is a very colorful challenge: Thankful/ Grateful + Use All 7 Colors of Rainbow.


A lot has been happening at India's border over the last few weeks and it made me realize the amount of sacrifice the soldiers do for the safety of the country. As a citizen, we should acknowledge their unrelenting hard work and we should be thankful to all of them for being our saviors. Hence, I created an art journal as a dedication to these brave soldiers and to thank them for their selfless duty.

Soldiers Are True Heroes - Art Journal Page
List of Supplies:

  • Ranger Distress Ink: Candied Apple, Faded Jeans, Pine Needles, Black Soot
  • Ranger Distress Oxide Ink: Broken China, Wilted Violet 
  • Artisty Inks: Orange Popsicle, Lime Kiss
  • Ranger Archival Ink: Jet Black, Cobalt 
  • Concord & 9th: Perfectly Penned Stamp Set
  • Just Rite: Vintage Travel Stamp Set 
  • Stencil: India Map
  • Sakura White Gel Pen
  • Sakura Micron 08 Black, Sakura Micron Black Brush Pen
  • Blending tool, Water mister 
Steps to create:
  • Outline India map and color it using Sakura brush pen & Black Soot ink.
  • Blend the inks in rainbow colors and spray with water mister.
  • Once dry, do a second generation stamping using Vintage Travel stamp and Cobalt Ink. 
  • Stamp the sentiment using Concord & 9th stamp and Jet Black Ink.
  • Doodle dots around the ink map using white gel pen.
  • Doodle a border using Sakura Micron and distress the edge of page using Black Soot Ink. 

I hope you liked my heartfelt dedication.

For more inspiration and details of challenge, hop on to The Twisted Challenges blog. Last date for participation is 31st March.

Love,
Dr. Neha Sanwalka Rungta,
Crafty Flirtations
&
The Twisted Challenges 

Tuesday, January 15, 2019

DIY Wall Hanging/ Bag Tassel

Hi Friends,

Have you guys checked out the January challenge at The Twisted Challenges Blog? The theme this month is: Something Old, Something New, Something Borrowed, Something Blue. For the mid month inspiration, I created a quick and simple bag tassel that can also be used as a wall hanging.


  • I used a very old background made using Distress Inks (I would have made this at least 3 years ago) and trimmed it to 3.25 by 3.25" size (Something Old).
  • I colored the edges using Chameleon Marker - Royal Blue (BL6)
  • I punched 2 wholes using a round punch and on one end I tied an old bead tassel (Something old) using some wire.
  • I recently received some new years gift from Itsy Bitsy and the gift contained a pack of Little Birdie Eufloria Handmade Flowers in a very light blue shade. I choose one of the blue flowers (Something New) and colored it using Lindy's Starbusrt Baby Blue Eyes Aqua spray (Something blue) and let it dry .
  • Once the flower was dry, I adhered it on the tassel end of the base and add a bead on it (which also I received as a gift from Itsy Bitsy on New Year's. 
  • I used a butterfly die cut (cut using a die I borrowed from Tejal) (Something Borrowed) and colored it using the same Lindy's Starburst Baby Blue Eyes Aqua and adhered it above the flower.
  • To finish the tassel, I strung in a blue thread through the other punched hole.

I hope you liked this simple & quick tassel.

To know more about the challenges & see other inspirations, click here. Last date to participate in the challenge is 31st January 2019.

Love,
Dr. Neha Sanwalka Rungta
Crafty Flirtations 
&
The Twisted Challenges 


Friday, August 3, 2018

Breastfeeding Week Art Journal Page #2

Hi Friends,

I am back today with another page dedicated to World Breastfeeding Week Celebrations. You can view the 1st page I did on this occasion here

Today's page is more representational then actually depicting breastfeeding in actuality. Breastfeeding lays the root of good health in children. It is the foundation of life that the child will live. Breastfeeding prevents a child from various health issues in later life too. So when a mother chooses to breastfeed her child, she is sowing the seeds of a nourished and healthy life. It is also a way of a mother expressing her love and care for her child and hence, I have added hearts to represent a mother's love for her child. 

Breastfeeding Week Art Journal
The theme at Art Journal Journey this month is "Count Your Blessings" and there can be no bigger blessing than Breastfeeding. Entering my art journal for the challenge here: https://art-journal-journey.blogspot.com/2018/08/count-your-blessings.html 

Please share this page & spread the knowledge & importance of breastfeeding.

Love,
Dr. Neha Sanwalka Rungta
Crafty Flirtations 

Thursday, July 12, 2018

This Too Shall Pass - Art Journal Page

Hi,

Time is one of the most essential and expensive commodities that any person has. It is essential cause you need time to do any work. A lot of us dream for doing so many things in life, but most often, we complain that we dont have time. This is specially the excuse when its about doing something for your personal self - like physical activity or yoga or a hobby or meditation.  However, if you manage your time well, you would never have this excuse and you shall have time for all that you want to do. I also call time expensive, cause once time passes, it is never coming back. You cant relive yesterday - today nor will you be able to relive today again tomorrow. You also dont know what is in store for you tomorrow. All that you have is the current moment that you are living in.

This Too Shall Pass - Art Journal Page 


This brings me to the 3rd aspect of time - "Time Changes" with every single moment. If you are not healthy today, you can change your diet/ activity pattern and get healthy in time. If you are not rich, you can be one if you work hard enough. If you are ill today, take medical treatment and you can feel better tomorrow. Its only a matter of time, how situations and life changes. And that's what the next page in the art journal that I made for Tejal represents.

This Too Shall Pass - Art Journal Page 

"This Too Shall Pass" is Khushboo's favorite quote. Even though I have never interacted personally with her, she is the 3rd musketeer in the trio of Tejal, Saumya & Khusboo and I felt that this art journal would be incomplete without including her favorites. So I requested Saumya to get information from Khushboo. Thanks a ton Saumya for the help.

This Too Shall Pass - Art Journal Page 


As this quote was all about time, all that I have used on this page is clocks. I used various clocks (its just one stamp from Heartfelt Creations, but I think its retired) showing different time points in a day to further re-enforce the fact that time changes. This page is one of my most favorite pages from this art journal.

Supplies used:
This Too Shall Pass - Art Journal Page 

Steps to Create:

  • Apply gesso on card stock/ chipboard base and set aside to dry.
  • Apply Ranger texture paste through  stencil on page.
  • Once dry, apply Oxide inks with help of a blending foam. Use water mister to get desired effects.
  • Once dry, do 2nd generation stamping using clock stamp on page with black ink. 
  • Stamp clock stamp on white card stock using black permanent ink and die cut.
  • Color the clock die cuts using Distress inks. 
  • Adhere the clock die cuts and sentiments on page using glue.
  • To finish the page, add faux running stitch on the page with paint pens.
This Too Shall Pass - Art Journal Page 


You can view the other pages by clicking captions below each image.

Page 1

Page 2
Page 3


Page 4

Page 5


Page 6
I hope you loved this page and are inspired to believe that there is a better time awaiting you in future.

Love,
Dr. Neha Sanwalka Rungta
Crafty Flirtations 

P.S. The page contains some affiliate links without any extra cost to you 

Thursday, May 31, 2018

Father's Day Card


Hi Friends,

Its Father's Day on 17th June. I am here with a masculine card that you could make for your father on this special occasion.


Supply List:
  • Bielo Smooth Card stock
  • Ranger Distress Oxide Inks – Iced Spruce, Broken China, Faded Jeans, Vintage Photo 
  • Ranger Distress Ink – Black Soot
  • Colour Box Frost White Pigment Ink
  • Archival Jet Black Ink
  • iCraft MDF gear embellishments & Metal watch embellishments 
  • Inka-Gold Jade Green
  • Sentiment Stamps from Peek-A-Boo
  • Fine paint brush, Foam tape, Mini-mister, Glue, Blending Tools

Steps to Create:

  • Cut and score card stock to create 5 by 7" card base 
  • Using a blending foam, blend Distress Oxide inks on 5 by 7” white card stock.
  • Add white and black splatters on the card panel using Black Soot and White ink. 
  • Distress edge of the blended card panel with Black Soot Ink and colour gears with same.
  • Add highlights to gears by rubbing and buffing Jade-Green Inka-Gold.
  • Adhere gears and metal watch on card panel using glue.
  • Blend Distress Oxide Broken China on a small piece of card stock and mist with water. Stamp the sentiment with Black ink and adhere on the card panel.
  • To finish the card, adhere the card panel on prepared card base.
Hope you liked this card.

(PS. This article was 1st published in the June 2017 issue of "Our Idea Book" Magazine)

Love,
Dr. Neha Sanwalka Rungta,
Crafty Flirtations 

Saturday, May 26, 2018

Dotted Floral Cards

Hi All,

Dot painting or painting with small little dots of various size has always attracted me and I have been wanting to try it for a long long time. Finally, when I recently brought the Dylusion Paints the vibrancy of the colors compelled me to finally take up dot painting. Though I have a long long way to go, I had great fun creating these cards using Dylusion Paints. I also got inspired by the colours (orange, blue, pink, green) and image of flowers at the Catchy Challenges to create this card.

Dot Painting On Cards

Dot Painting On Card

Dot Painting On Card
Supplies Used:

Steps to Create:
  • Cut and score a card stock to create a top folding 4.25" by 5.5" card base.
  • Cut flower and leaf shapes using dies. Color  flowers using Squeezed Orange paint or Spun sugar ink and leaves using Dirty Martini Paint or Cracked Pistachio ink.
  • Paint dots of various sizes on flowers and leaf using ball tools or paint brush.
  • Stamp thank you on card base. 
  • Stack 2 white flower die cut and adhere painted flower on top to add dimensions. 
  • Stick flowers and leaves on the card. 
  • Adhere dew drops to finish the card.

Hope you loved this funky floral card. 

I would like to enter this card at the Catchy Challenges #4. Theme: Let's Get Pinspired 

Love,
Dr. Neha Sanwalka Rungta

Disclaimer: The post includes some affiliate links.

Monday, May 21, 2018

A Feathery Great Day

Hey Friends,

I am back with a neat and clean card today.


Supplies:
  • iCraft Floral Natura card stock 
  • Die Versions A Great Day die
  • Spellbinders Die - Feathers
  • Ranger Distress Oxide Ink: Spiced Marmalade
  • Ranger Distress Ink: Candied Apple
  • Nuvo Mousse Fresh Copper
  • Foam tape, glue, water mister, heat gun 
Steps to create:

  • Cut and score Natura paper to create 4.5 by 5.25" side folding card base.
  • Smoosh Distress ink and Oxide ink on craft mat, mist with water, place white card stock on the ink to colour it and dry using heat gun. Repeat the layer till desired colour is achieved. 
  • Once the desired colour is achieved, die cut "A Great Day" and some feathers from it.
  • Die cut 2 "A great day" sentiment from white card stock and stack and adhere on top of each other. Adhere the coloured "a great day" on top of stacked white die cut.
  • Adhere the sentiment to card base using glue. 
  • Rub & buff some Nuvo mousse on feathers. Arrange and adhere feathers on card base to finish the card (adhere 2 feathers using foam tape for added dimension). 
Hope you liked this card.

Love,
Dr. Neha Sanwalka Rungta
Crafty Flirtations 

Thursday, May 17, 2018

To Great Friends - An Art Journal Page

Hi friends,

They say friends are the family you choose for yourself & God has blessed me with some amazing friends who are now like family to me. Recently, I wanted to make a gift for my ever helpful, crazy, amazing crafty friend "Tejal", something that was personalized and woven with  elements that she & 3 of her friends (Saumya, Khushboo & myself) liked.

As Art Journals are my absolute favorite to make, I decided to make a mini, personalized Art Journal or Art Book for Tejal including our favorite quotes, motifs, colors & flowers or things that we like.


I used a 6 by 7 ready chipboard album to create this art journal as I wanted something sturdy and strong as it was going to travel all the way to Ahmadabad from Mumbai, but you could use a 300 gsm card stock for same. This art book contains 10 sides (5 pages back to back) all together. Here's the cover page of the journal.


Tejal's favorite flowers are Hydrangeas. So, I decided to use them as focal point on the cover page. However, when I started making the cover, I realized I didnt have  any Hydrangea stamps. I was on verge of giving up the idea of using Hydrangeas on the cover, when it dawned on me that I had Hydrangea Lawns pattern paper from Dress My Craft that I could use for focal point. The entire page is built around colour scheme of Hydrangea flowers using the heat embossing resist technique with Distress Inks for background as its my absolute favorite technique for background.


Supplies Used:

  • 6 by 7" card stock/ chipboard 
  • Dress My Craft Hydrangea Lawns 6 by 6 paper pack
  • Penny Black Blooming Gardens stamp set
  • Distress Inks: Seedless Preserves, Cracked Pistachio, Peacock Feathers
  • VersaMark Ink
  • WOW! Clear embossing powder
  • Itsy Bitsy 2 in 1 texture paste (used as gesso)
  • Dress My Craft Frosted Sugar Powder
  • Glue, scissors, foam tape, heat gun & blending tools
  • Printed sentiment 


Steps to create:

  • Apply gesso on the card stock/ chipboard base and let it dry. Once dry, apply Cracked Pistachio and Peacock Feathers ink using blending tool. 
  • Once the Distress ink has dried, stamp the flowers using VersaMark ink and heat set using clear embossing powder.
  • Apply Seedless Preserves (over Peacock Feathers) and Peacock Feathers (over Cracked Pistachio) ink to create a beautiful resist technique background.
  • Fussy cut the flowers from Hydrangea Lawns pack. Distress the edges using Seedless Preserves ink  and adhere to the base using glue & foam tape.
  • Apply glue to the edges of the page and sprinkle with Frosted Sugar Powder.
  • To finish the page, adhere the printed sentiment/ quote. 

Hope you love the cover page from this art journal. I shall be back soon with Page 2 of the journal.

I would like to enter this art page at 


Love,
Dr. Neha Sanwalka Rungta
Crafty Flirtations. 

Saturday, May 12, 2018

Bees come where flowers blossom - Art Journal Page

Hi Friends,


Last time I shared process of creating the above rustic & grungy art journal page with you all. However, once I finish the page, I realised I adhered the sentiment sticker upside down and being an art journal, I had to correct it so that when I flip through the journal, I can read it correct. So, I removed the sentiment stickers & edited the page to add flowers & some bees. Here is the updated page & process for same (beyond what is described in the previous post).


Supplies:

  • White card stock
  • Floral Die Cut Outs
  • Ranger Distress Oxide Inks: Twisted Citron & Salty Ocean
  • Ranger Distress Ink: Black Soot
  • Ranger Black Archival Ink
  • Concord & 9th Perfectly Penned Stamp
  • Sakura Micron, Markers & Pencil colours for colouring, Water Mister, Heat Gun, Glue. scissors

Steps To Create:
  • Smoosh Oxide inks on the craft mat, mist with water and colour floral cut outs by dipping them in ink. Dry them using heat gun. Repeat the process till you achieve the desired effect. Add some dots on flower center using black Micron. 
  • Smoosh some Black Soot ink on the craft mat, dilute with water and make splatters on the page. 
  • Draw some honey bee on card stock, colour using markers or water colours and fussy cut.
  • Stick the flowers and honey bees on the journal page.
  • Add shading around the flowers using colour pencils.
  • Finish the layout by stamping sentiment using black ink. 
I hope you love this updated version as much as I love it. 

Please leave your love & feedback in the comments section.

Love,
Dr. Neha Sanwalka Rungta
Crafty Flirtations 


Wednesday, May 9, 2018

Quick Rustic And Grungy Art Page

Hi Friends,

I am back with another quick & simple art journal spread with a little grungy & rustic look.


Supplies:
  • Gesso
  • Ranger texture paste
  • iCraft stencil
  • Ranger Distress Ink: Peacock Feather, Stormy Sky, Bundled Sage
  • Dymo Label maker
  • Palette Knife, Blending Tool, water mister, kitchen towel, paint brush 
Steps to Create: 
  • Apply gesso on the journal page with paint brush and let it dry. (Tip: Apply thick coats on some places for added texture). 
  • Once the gesso is dry, apply texture paste through stencils with help of palette knife and let it dry. 
  • Once dry, blend distress inks on the page using blending tools.
  • Mist water and dab on various places using kitchen towel to pick up some ink. 
  • Make sentiment using Dymo Label maker & stick on center of the page.
Hope you love the grungy & rustic look of this art journal page.

Love,
Dr. Neha Sanwalka Rungta
Crafty Flirtations 

Saturday, May 5, 2018

Seek Magic - An Art Journal Page

Hi Friends,

Sometimes all it takes to create an art journal is a few Distress inks, a stencil and stamps. I am here to share a simple and elegant art journal spread. 


Supplies:
  • Ranger Distress Ink: Peacock Feather, Stormy Sky, Picked Raspberry, Candied Apple, Black Soot
  • Ranger Black Archival Ink 
  • Dylusions Stamp: Doodle Delight DYR40927
  • Concord & 9th Perfectly Penned Stamp
  • iCraft Stencil
  • We R Memory Keepers M,A,G,I,C mini alphabet stamp sets
  • Sakura White Gelli Roll Pen
  • Water Mister, blending tools, heat gun, paint brush  
Steps to Create:
  • Blend Peacock Feather, Picked Raspberry and Candied Apple ink on the journal using blending tools.
  • Mist with mini mister and dry using a heat gun.
  • Apply Stormy Sky ink over Peacock Feather section through a stencil in some parts. 
  • Apply Picked Raspberry over Picked Raspberry section and Candied Apply over Candied Apple section through a stencil in some parts.
  • Smoosh some Black Soot ink on a craft mat, dilute using some water and make splatters on the journal page using a thin paint brush. 
  • Stamp various images from Dylusions stamp at different heights from bottom of page using black ink.
  • Stamp the sentiment using black ink. 
  • To finish the layout, add highlights on the sentiment using white gel pen.
Hope you all like this art journal page.

Love,
Dr. Neha Sanwalka Rungta
Crafty Flirtations 

Thursday, February 16, 2017

Lets Get Inky - Paper comparisons

Hi Friends,

A few days back, The Craft Studio launched 2 sets of paper: Floral Natura Collection (FNC) and Floral Super White Collection (FSWC). I received a pack of sample papers from Foram Shah & Dinesh Shah of The Craft Studio.

About these papers: 
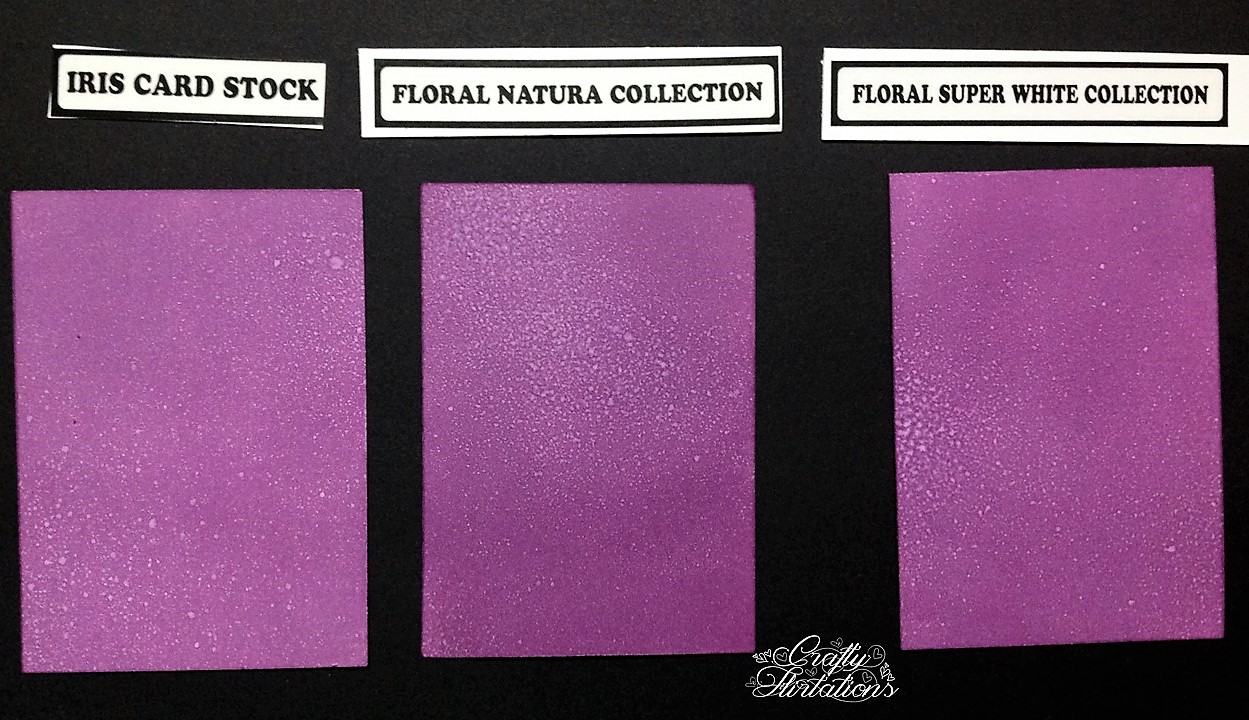
Both FNC and FSWC are 270 gsm in weight. FSWC is pure white and is more whiter than Iris paper while FNC is one shade pale and has colour same as Iris paper. FNC and FSWC have good water retention ability with FSWC being able to absorb more water as compared to FNC.

Even thought these papers were launched as papers to make flower, with 270 gsm and good water absorbing properties, I decided to try them for my card backgrounds and inking techniques, heat embossing, water colouring etc. and compare it with Iris paper (as I use the same for background techniques regularly).

So, FNC, FSWC and Iris paper were cut to ATC size of 2.5" by 3.5" and put to test for various techniques

Test 1: Distress ink & misting.
Result: My experience in Mumbai city has been that when you use distress ink on Iris paper and let it sit for some time, the distress ink goes a shade lighter. Similar results were seen on FNC & FSWC. So compares with Iris paper exactly


Test 2: Distress Ink Blending
Result: Distress Ink Blending was good on both FNC & FSWC and comparable with Iris paper. FNC overall had slightly better outcome for ink blending as compared to FSWC


Test 3: Distress ink  smooshing with help of acrylic block
Result: Results were good for all 3 papers (The acrylic block I used had a grid and there were grid marks on the outcome. As you notice, grid marks are almost negligible on FSWC, which I assume are because of its high water soaking capacity. So I would choose FSWC for this technique)


Test 4: Distress ink smooshing with water mist from a craft mat
Result: Excellent for all 3 papers


Test 5: Water lifting technique
Result: Even though all 3 papers worked well for water lifting technique, FSWC performed much better than FNC for this technique. I love the outcome for water lifting on Iris and FSWC more than FNC


Test 6: Stamping with distress ink
Result: Similar effect on all 3


Test 7: Watercolour 
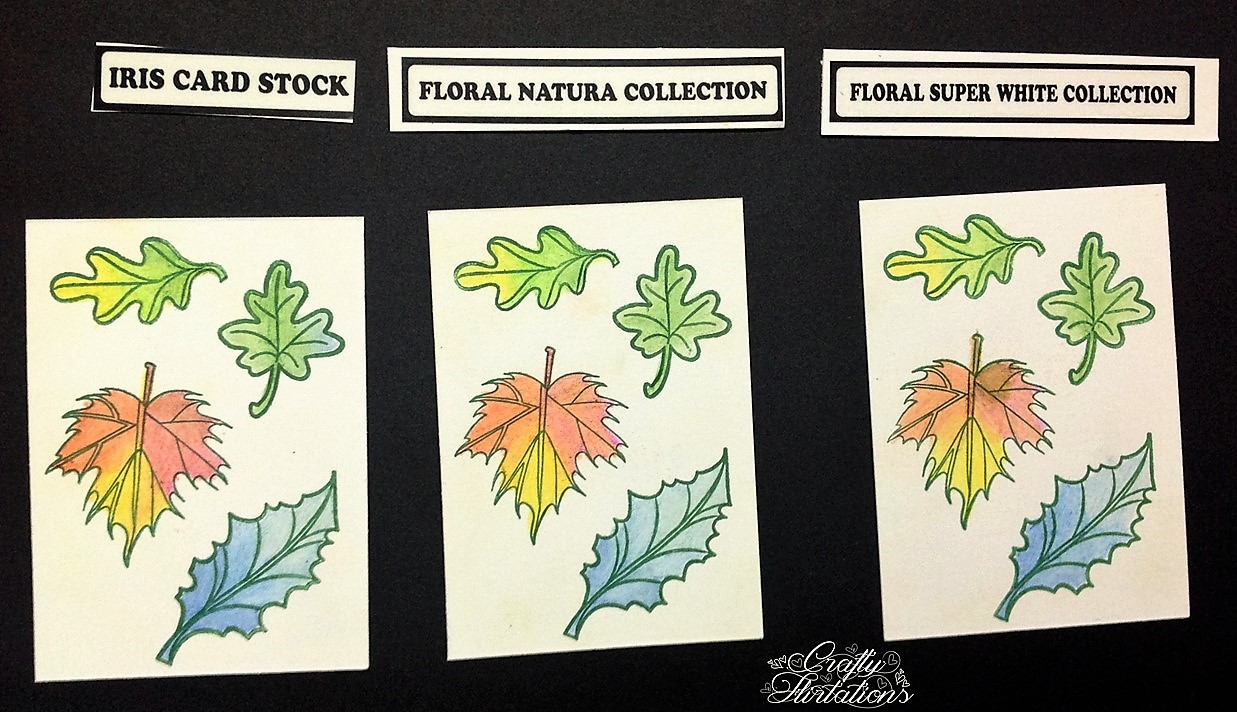
Result: With my limited knowledge in water colouring, I tried all 3 papers for water colouring a Peony. All 3 papers worked equally well for this technique. Amongst 3, FSWC with it high water absorbing capacity worked the best for water colouring.


Test 8: Stamping with Archival inks
Results: Fantastic for all 3 papers


Test 9: Heat Embossing & Resist distress inking
Result: Excellent for all 3 papers


Test 10: Pencil colour & blending with odourless thinner


Test 11: Gelatos for background & blending with baby white
Result: Good for all 3


Test 12: Cosmic Shimmer Spray & Itsy Bitsy Splash Spray for background & Scoring
Result: To test the strength of both FNC & FSWC, I scored both the papers & neither paper tore, i.e. they scored well. Also water based spray paints like Cosmic Shimmer Spray & Itsy Bitsy Splash Spray worked well on both papers 


To sum up, both papers were comparable to Iris paper for most techniques and give excellent results. 

Thank you Forum & Dinesh Shah for the free samples. I loved working with both of them. 

PS: I would be converting these into ATCs. So if anyone would like to swap/ trade one of these ATCs with me, please leave a comment. I am open to swapping internationally too. 

Hope you all enjoyed comparison review of FNC & FSWC with Iris paper. Do leave your feedback in comments below. 

Love,
Dr. Neha Sanwalka
Crafty Flirtations


Saturday, February 11, 2017

All About ATCs

Hi everyone,

I would like to share some information about Artist Trading Cards (ATCs). 

Artist Trading Cards or more commonly known as ATCs are miniature pieces of arts that are created and traded by artists around the world. Artists create, trade and collect art at organised "swap" events, either in person or online. ATCs are never sold but are always traded. 

ATC trade/swaps have been around for about 20 years now. The 1st ATC swap took place in 1997. In the year 1996 - 97, Swiss artist M Vanci Stirnemann, created 1200 miniature cards and exhibited them at his second-hand bookshop and gallery INK art & text in Zurich, Switzerland from 23rd April - 31st May 1997. On the last day of exhibition, he invited others to create their own cards and trade/ swap with him with the intention to allow people from different backgrounds to participate in an ongoing art project, which was not part of the art market. 

A few weeks after the first ATC exhibition and trading session in Zurich, the Canadian artist Don Mabie adopted the idea and showed artist trading cards at the Alberta College of Art and Design in Calgary, Alberta, Canada. In September 1997, a trading session was organised at the New Gallery in Calgary.

(More About  about history of Original ATC Trading

Today ATCs are exchanged world over by artists either randomly or through organised swaps in person or online. ATCs are created in various medium including dry medium (pencils, pens, markers, etc.), wet media (watercolor, acrylic paints, etc.), paper media (in the form of collage, papercuts, found objects, etc.), or even metals, fiber, wax and other materials. Mixed-Media ATCs are a rage all over the world currently. When making ATCs, you dont have to follow any rule as to what medium you use except 1, i.e. for size. All ATCs have to be of the same standard miniature size of 2 1/2" and 3 1/2".

Here are some of the mixed-media ATCs I have made over last few months using various techniques such as stamping, distress inks, alcohol inks, die cuts, quilling, stickers, stencilling, mixed media etc.


Hope you all liked these ATCs. Do leave some love if you like them.

Love,
Dr. Neha Sanwalka
Crafty Flirtations