Hi Friends,
Welcome to the Part 2 of Stencilling Techniques used in "Happy Anniversary AJ" banner. Hope you enjoyed the techniques shared in the Part 1 of the Stencilling techniques used in the "Happy Anniversary AJ" banner. The stencils used for the project are from Pie Lane and can be ordered from Maninder Kaur of Rainbow Craftykari (Please check Part 1 to see the designs).
In Part 2, I am going to share all the stencilling techniques I have used for "Anniversary".
Techniques used for "ANNIVERSARY"
Alphabet A: Perfect Pearls technique: With help of sponge finger dauber, I applied Pine Needles distress ink through the stencil design. Once the ink was dry, I applied Ranger Perfect medium through the stencil design. Once the design was covered well with Ranger perfect medium, I lifted the stencil away and dusted the design with Ranger Perfect Pearl Perfect Gold. Dusted away any excess perfect pearl and buffed the design with dry cloth to get the shine of perfect pearls.
Welcome to the Part 2 of Stencilling Techniques used in "Happy Anniversary AJ" banner. Hope you enjoyed the techniques shared in the Part 1 of the Stencilling techniques used in the "Happy Anniversary AJ" banner. The stencils used for the project are from Pie Lane and can be ordered from Maninder Kaur of Rainbow Craftykari (Please check Part 1 to see the designs).
 |
| Happy Anniversary AJ |
In Part 2, I am going to share all the stencilling techniques I have used for "Anniversary".
Techniques used for "ANNIVERSARY"
 |
| Perfect Pearls Stencilling Tutorial/ Technique |
 |
| Stencil on Stencil - Stencilling Tutorial/ Technique |
Alphabet N: Stencil on stencil technique: With help of sponge finger dauber, I applied Cinnamon Tea Artistry ink through the stencil design. Once the N design was filled, I placed a texture stencil from Pie lane on top of the N stencil and with help of another sponge finger dauber rubbed Fried Brick distress ink to get the textured look of stencil on stencil technique
 |
| Filling design with pen - Stencilling Tutorial/ Technique |
Alphabet N: Filling design with pen: I love doodling and so for alphabet "N" I used Sakura Micron 05 light green colour to outline the N. Once the outline was in place, I lifted the stencil and filled the space with diagonal lines :) This is a very simple technique to make gorgeous designs as all you need is some colour pens and the stencil and you can use any patterns to fill in the alphabets.
Additional Tips: You could use Steadler Triplus Fineliner or even your ball point pen for this technique
Additional Tips: You could use Steadler Triplus Fineliner or even your ball point pen for this technique
 |
| Pencil colours with thinner Stencilling Tutorial/ Technique |
Alphabet I: Pencil colours with thinner: Koh-I-Noor Hardmuth Astra Pencils are my some of favourite pencil colours I have ever owned. There are 6 neon colours in the set and are wax based. I outlined the design using Red Steadler Triplus Fineliner and then coloured using #341173 and #341172. Once the design was filled in, I used a paper stump and Daler Rowney low odour thinner to smooth out the colour to get brilliant effects.
Additional Tips: You could use any other brand of pencils for this technique
Additional Tips: You could use any other brand of pencils for this technique
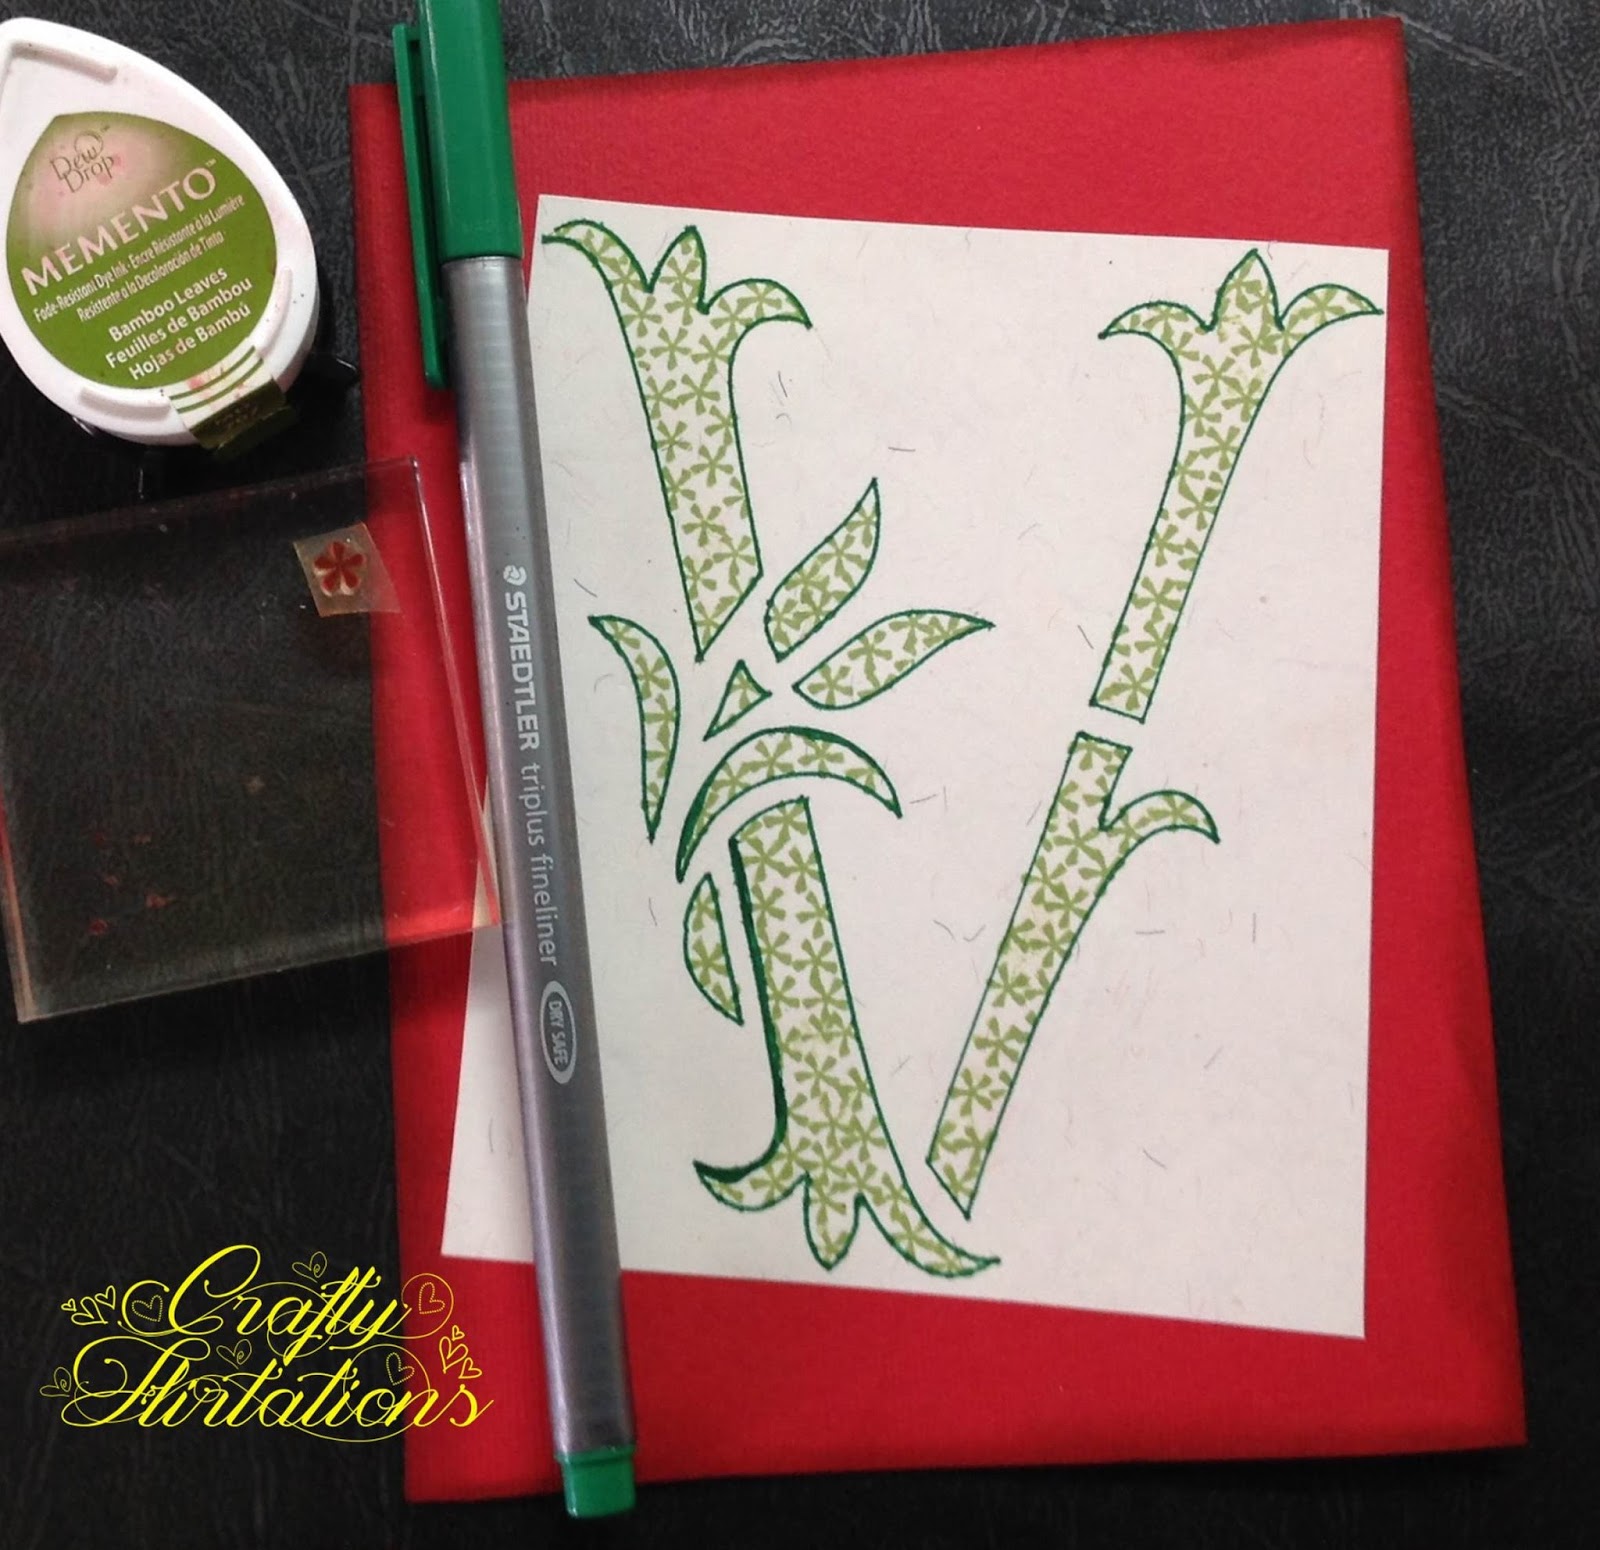 |
| Stamping through stencil - Stencilling Tutorial/ Technique |
Alphabet V: Stamping through stencil: This is a super fun technique. I outlined the design using Green Steadler Triplus Fineliner and then using a flower stamp from Varna's Love Birds and Momento Bamboos Leaves Ink, stamped through the stencil
Additional Tips: You could use any small design stamps such as circle, hearts, square for this technique. Simple designs work best for this technique
 |
| Distressing with stamping - Stencilling Tutorial/ Technique |
Alphabet E: Distressing with stamping through stencil: With help of sponge finger dauber, I applied Dried Marigold distress ink through the stencil design. Then using a flower stamp from Varna's Love Birds and Archival Red Geranium ink, stamped through the stencil. Unlike V, the look of alphabet E is completely different and adds texture to the alphabet.
 |
| Glitter - Stencilling Tutorial/ Technique |
Alphabet R: Glitter with stencil: I outlined the design using Green Steadler Triplus Fineliner. Then I applied a thin coat of glue with help of a brush and sprinkled Green Pie Lane Pixie Dust Fine Glitter to cover the entire design. Once the 1st coat was dry, I applied a second coat of glue and glitter to get a solid R image.
Additional tips: You can colour the alphabet before applying glitter and you wont have to do 2 coats of glitter
Additional tips: You can colour the alphabet before applying glitter and you wont have to do 2 coats of glitter
 |
| Die-cutting with stencil - Stencilling Tutorial/ Technique |
Alphabet S: Die-cutting Technique using positives: This technique was suggested by Maninder Kaur of Rainbow Craftykari when I got the stencils from her. I took a pattern paper and outlined the design on the paper on the right side (i.e. the side I wanted on top). Then with the help of Gyro-cut tool, I cut entire stencil and used the positives to make the banner "S".
Additional Tips: Check Part 3 to know how you can use the negatives from this technique too
Additional Tips: Check Part 3 to know how you can use the negatives from this technique too
 |
| Shading with Distress/ Artistry Ink - Stencilling Tutorial/ Technique |
Alphabet A: Shading With Water based: Love shading with water based inks? They go so well with these alphabet stencils. I shaded the "A" with Pine Needles distress ink and Cracked Pistachio distress ink with help of a finger dauber.
Additional tips: Use finger dauber for this technique as the small circumference of the dauber makes shading easier
Additional tips: Use finger dauber for this technique as the small circumference of the dauber makes shading easier
 |
| Distress ink with distress glitter Stencilling Tutorial/ Technique |
Alphabet R: Water based ink with distress glitter: This is an extension of techniques used for "A". I shaded the "I" with Orange Popsicle Artistry ink and fried brick distress ink with help of a finger dauber. Then I applied some glossy accent randomly and sprinkled distress glitter to get the gorgeous shine
 |
| Inka Gold Stencilling Tutorial/ Technique |
Alphabet Y: Inka Gold Technique: Viva Decor’s Inka Gold is a revolutionary product that produces an amazing metallic finish without any toxic chemicals as it has beeswax as its core ingredient. With help of a sponge I applied Inka Gold Jade through the stencil design to get this gorgeous shiny green Y.
Hope you have enjoyed Part 2 of the stencilling techniques. Continue to read Part 3 to read about stencilling techniques used to create initials AJ and how we put the banner together.
Please do leave your comments & love.
Love,
Dr. Neha Sanwalka
Crafty Flirtations
Have pinned your tutorial series...love it and hope it sends you some traffic
ReplyDeleteCheers
Dr Sonia
Wow :) Thank u so so much Sonia :) Thats so sweet of you to do :) Means so much :) Cant thank you enough :) Thanks a lot :)
DeleteWoow!!! So cool <3 totally loved the way you have showen variety with jsut one stencil <3
ReplyDeleteThank you so much :) It means a lot to me :)
Delete