Monday, December 18, 2017

Quick & Simple Christmas Cards

Hi Friends,

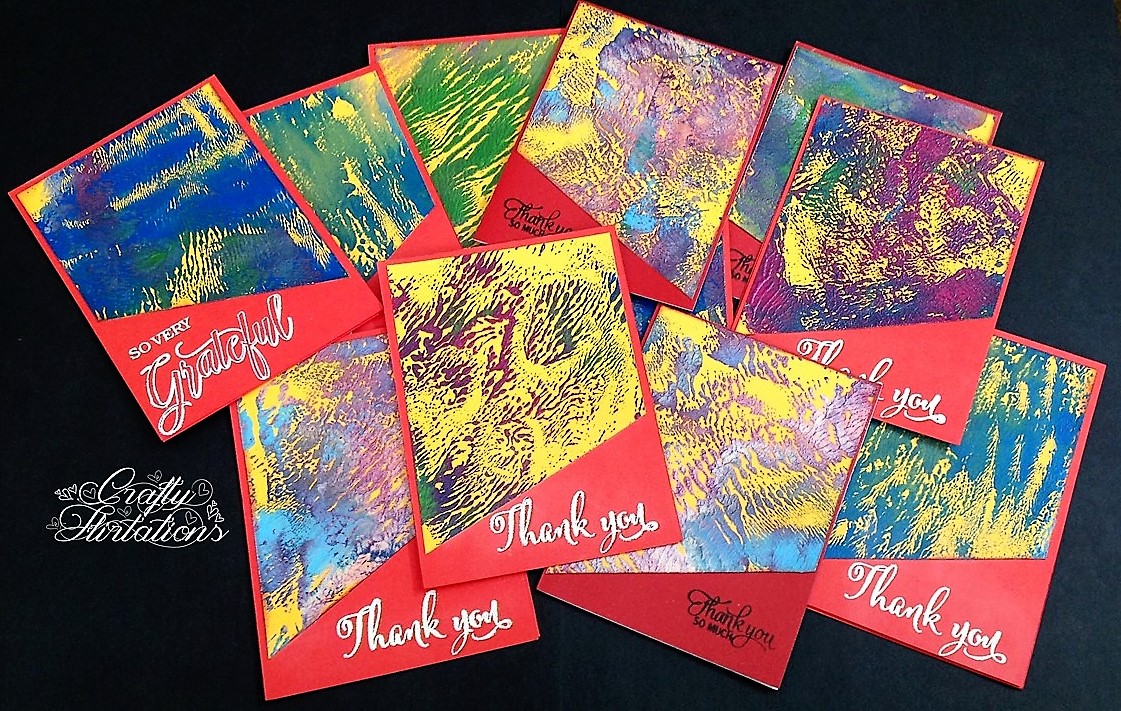
As crafters, we often get presented with opportunities where we can bring that extra smile & happiness to some.  I recently visited an old-age home in my vicinity that presented me with one such opportunity. As Christmas is around the corner, along with my friends, I decided to make & donate some Christmas cards for the elderly at old-age home. I didnt have any Christmas themed supplies, so I dug through my stash to create these beautiful cards


Materials Used:

  • Ranger Distress Oxide Ink: Candied Apple
  • Art Anthology Dimensional Paint: Brick (stone effect), Emerald (Gem Stone) 
  • Ranger Red Geranium Archival Ink 
  • iCraft Rose stencil
  • Unity Sentiment Stamp
  • Sequins from Mudra & Papericious
  • Wink Of Stella 
  • White Card stock, Acetate Sheet & Glue

Steps To Create:

  • Make a triangle stencil from an acetate sheet.
  • Cut and score card stock to create a 4 by 6" told folding card.
  • Place the rose stencil on the card and over-lay a triangle stencil on it.
  • Either blend Distress Oxide ink on the card or apply a layer of dimensional paint through the stencil to resemble a Christmas tree.
  • If using Distress Oxide Ink, once the ink is dry, paint over using Wink Of Stella to add Shimmer.
  • Stamp the sentiment using Archival ink.
  • To finish the card, add some sequins on the card to resemble ornaments.

Hope you are inspired to dig through your stash to create cards. 

Love,
Dr. Neha Sanwalka Rungta 

Saturday, December 16, 2017

It's The Seasons To Be Jolly - Art Journal

Hi Friends,

Art journal for me is not just a way of expressing my thoughts, feelings, moods but its also about trying different techniques that I have been meaning to try for a long time. As Christmas is around the corner, I made an art journal page with Ornaments as my focal points and used a few different techniques to create my focal points.


Supplies used:
  • Ranger Distress Ink: Cracked Pistachio, Candied Apple, Wild Honey
  • Cosmic Shimmer Mist: Meadow Lush, Blue Lime
  • Ranger Archival Ink: Red Geranium, Jet Black
  • VersaMark Ink 
  • Art Anthology Dimensional Medium - Brick (Stone Effect)
  • iCraft Stencils
  • iCraft Floral Natura Paper Card stock 
  • Snowflakes Stamp
  • Concord & 9th: Sophisticated Script Stamp Set
  • Ranger Clear Ultra-thick Embossing Enamel (UTEE)
  • WOW Cherry Red Embossing Powder
  • Ranger Glossy Accent 
  • Rhinestones, palate knife, foam tape, yellow floss, circle cutter, heat tool  

Steps to Create:
Background: 
  • Blend Cracked Pistachio ink on the art journal.
  • Stamp snowflakes stamp (2nd generation stamping) using Red Geranium Ink.
  • Spray the cosmic shimmer sprays at a close distance on random spots and let it dry .
Pre-preparation for ornaments:
  • Cut 2" diameter circle from white card stock using circle cutter or a die (6 in number).
  • Blend Wild Honey ink on the cut circles.
  • Cut small small squares from card stock and colour using Candied Apple Ink.


1st Ornament from Left:
  • Blend Candied Apple Ink on the prepared ornament through iCraft circle cluster Stencil.
  • Once the ink is dry, apply Glossy Accent on each of the circles and keep it aside for drying. 
2nd Ornament from Left:
  • Blend Candied Apple Ink on the prepared ornament through iCraft Stencil. 
  • Once the ink is dry, apply a layer of Glossy Accent on the full circle.
  • Once dry, reapply a second coat of Glassy Accent and keep it aside for drying.

Centre Ornament:
  • Rub VersaMark Ink on the prepared ornament and sprinkle UTEE and heat set.
  • Once the UTEE is evenly melted and hot, sprinkle another layer of UTEE and heat set again.
  • Repeat the process 3-4 times to get a thick layer.
  • Once happy with the thickness of the enamel, randomly sprinkle some Cherry Red embossing powder and heat set and while the entire enamel layer is still hot, stamp on it with Snowflakes stamp to give an embossed effect (Rubber stamps work the best for this technique and before stamping on hot layer of enamel, apply VersaMark Ink on the stamp to prevent any damage from Enamel).

4th Ornament from left
  • Simply stamp some snowflakes on prepared ornament and heat set with Cherry Red Embossing powder.

5th Ornament from left
  • Apply a generous layer of stone effect Art Anthology Brick Dimensional paste through iCraft stencil on the prepared ornament and let it dry.
Last Ornament:

  • Splatter few drops of watered-down Candied Apple Ink on the ornament & embellish with a few rhinestones.
To finish all the ornaments:
  • Adhere the coloured red squares and floss on the ornaments to complete them.
Finishing the Art Journal page: 
  • Arrange and mark placement for your ornaments on the page.
  • Using some water-down Candied Apple ink, create a shadow effect on the outer ends of markings (as the Candied Apple ink re-activates some of the green inks on backgrounds, it creates a subtle shadow for ornaments.
  • Once the ink is dry, adhere the ornament  to the page with foam tape and give an uneven outline to the page with colour of your choice.
  • Adhere the extra floss on the backside with glue.
  • To finish, stamp the sentiment using Jet Black Ink and Sophisticated Script Stamp Set.

I hope you enjoyed reading about my Art Journal Page. 

Wish you a Merry & Bright Christmas :) 

Love,
Dr. Neha Sanwalka Rungta
Crafty Flirtations 

Thursday, October 5, 2017

Sparkling Décor

One of the scenarios of post Goods and Service Tax (GST) is that scrap bottles no longer have any resale value, especially when you try to sell them to your local “kabadiwala”or Scrap dealer. These bottles are now likely to end up in a landfill and would not decompose for years. So, instead of throwing these bottles away in trash, light up your home by recycling these into beautiful home décor. I have used some very simple supplies to recycle 200 ml lassi bottles.


Supplies:

  • Glass bottle
  • Mod-podge
  • Dress My Craft Frosted Sugar Powder
  • Dress My Craft Sparkling Dust 
  • Flowers for embellishments 
  • Fairy Lights


Bottle on left: Mix acrylic paints with Mod-Podge and dab on glass bottle using sponge in strips of increasing breadth (You can use masking tape for creating sections). Once the paint is dry, apply Mod-Podge in remaining area and sprinkle with Dress My Craft Frosted Sugar Powder. Embellish using flowers 

Bottle on right: Mix Acrylic paints with Mod-podge and dab on glass bottle using sponge in increasing intensity of colour from bottom to top in an Ombre’ tones. Once the paint is dry, drip Mod-Podge around the bottle and sprinkle Dress My Craft Sparkling Dust. Let it air dry. 

As these bottles have very narrow opening, I used fairy lights to light them up :)

You can also gift them to your loved ones on Diwali. 

Thanks Kavita Lohia Agarwal for clicking stunning photos of these bottles <3

Love,
Dr. Neha Sanwalka 


Thursday, June 29, 2017

Stamping with Distress Oxide Inks

Hi Friends,

I am back with another card today using Ranger Distress Oxide Inks. Oxide inks are absolutely fantastic for stamping. However, one must remember that these inks stay wet for a long duration so one should not touch the stamped image till the ink drys to avoid smudging. Heat tool can also be used to speed drying process. Hope you like the card.


Best Regards,
Dr. Neha Sanwalka
Crafty Flirtations 

Thursday, June 22, 2017

Stamping on coloured card stock with Oxides

Hi Friends,

Today I am sharing another card made using Ranger Distress Oxide Inks. As Distress Oxide inks are a blend of pigment and dye ink, they work great for stamping & what's more fantastic is that they can be used for stamping on coloured card stock too.


Supply List:
  • Blue textured card stock
  • White Iris Card stock 270 gsm
  • Ranger Distress Oxides: Worn Lipstick, Peeled Paint & Broken China 
  • Glossy Accent
  • Hero Arts Cling Stamp - Scattering Leaves 
  • Lawn Fawn Summer Time Charm Stamp 

Hope you all love the card.

Love,
Dr. Neha Sanwalka
Crafty Flirtations 

Wednesday, June 21, 2017

Distress Oxide Cards

Hi friends,

Ever since I brought Ranger Distress Oxide inks, I have fallen in love with them. I have tried various techniques with them and one of the techniques that I enjoyed trying was by by "Stamp N Ground Crafts By Echo Noble". Here is my try with the technique.


Hope you all like the cards.

Love,
Dr. Neha Sanwalka Rungta
Crafty Flirtations 

Tuesday, June 20, 2017

Our Idea Book - India's Premier Art & Craft Magazine

Hi Friends,

This post is to share one of my biggest achievements & the story behind it. India's 1st ever Art & Craft Magazine "Our Idea Book"(FB page) (Instagram) was launched last Tuesday on 13th June 2017, here in Mumbai, India and what a proud moment it was for me as I am the Editor on this magazine. Here is the cover page of the inaugural issue:


I would love to share the story of how this happened & thank people who gave me this opportunity. One fine Wednesday, I got call from Dinesh Shah, co-owner of The Craft Studio that they are planning something and the 1st name that comes to their mind is me. He asked me to come down to their store and said he would discuss more when I meet them. I am sure you all would agree, if yours is the 1st name someone thinks of when they wants to start something new, you dont want to give it up. As luck would have been, I was very busy with my statistics work and I requested a meeting on Saturday. I had no idea it was a magazine that they were thinking of and only when Forum (Dinesh's better half & co-owner of The Craft Studio" called me on Friday (day before our meeting was scheduled for) she told me they are thinking of a magazine and they want me to be the Editor.

It's impossible to explain the rush of emotions I had during that phone conversation with Forum: from excitement that India will have an Art & Craft Magazine to being unsure if I was fit for the job. Till that day I had written many articles in Nutrition and Health for websites & magazines and had blogged about my crafting adventures here, but to be an Editor on a magazine was huge. So I decided to meet them before I made the decision & met them the following day and as they..rest is history. I am here today, sharing with you all, the cover of the 1st ever Art and Craft magazine from India in capacity of Editor for same. 

Our Idea Book is a bi-monthly magazine and will be published in February, April, June, August, October and December. 

So what all would you find in our magazine: 
  • Card inspirations
  • Mix media projects
  • DIY Projects
  • Step by Step tutorials 
  • Interviews of crafters and artists from across the globe
  • New techniques
  • Product reviews
  • Challenges
  • City wise store list & much more 
  • And you get some free crafty goodies with each issue too 
I hope all crafters and artists from across the world love the magazine and enjoy reading it. I welcome you all to be a part of this beautiful journey with us. 

You can purchase the magazine from: Our Idea Book
If you would like to contribute to the magazine, email us your profile at editor.ourideabook@gmail.com
If you would like us to review a product, email us on editor.ourideabook@gmail.com
If you would like to advertise with us, email us on info.ourideabook@gmail.com
If there are any artists or products or techniques you want to know more about, email us on editor.ourideabook@gmail or info.ourideabook@gmail.com 

I would like to end this post by acknowledging a few people. Thank you so much Forum & Dinesh for getting me on board your dream and letting "Our Idea Book" become my baby too :) I would also like to thank my husband Jitesh Rungta & my Father-in-law Omprakash Rungta for supporting me in my work & my mom & dad (Pushpa & Jagdish Sanwalka) for educating me & making me capable enough for same.


Hope you all enjoy reading our magazine :)

Love,
Dr. Neha Sanwalka Rungta
Editor, Our Idea Book
Crafty Flirtations 

Wednesday, May 31, 2017

Cards For Cause - Soldier Drive - May 2017

Hi Friends,

After the last soldier drive during last Diwali, I have been wanting to repeat the drive and send out more cards to Soldiers who take care of our country. So, I undertook another Cards for Cause - Soldier Drive on a personal level and set along to make cards for our brave soldiers. 2 of my Facebook friends Halak Shah & Tanvi Shah also contributed cards to this drive. When I started making cards for the drive, I realised I didnt have any Thank You or Gratitude Stamps. Before I searched online, I asked Varshitha Nagarajan of Mudra Stamps if she had any Thank you or gratitude sentiment stamps . When she got to know what I had set on to do, she very kindly sent me 2 gorgeous stamps from Mudra as her contribution for this drive. Thank you so much Halak, Tanvi & Varshitha for contributing to this drive along with me. The smile on the face of soldiers was priceless.  


Now as I have confirmation that the cards have reached their destination, I am sharing various cards (a total of 128) I made for this drive. The sentiment stamps used as exclusively from Mudra [or from Varna (Mudra was Varna before)] as I wanted to honour Varshitha's contribution towards the drive. I have used various techniques like dendritic mono- printing, stencilling, ink blending with Ranger Distress Oxide inks, Backgrounds with dimensional paints, using pattern paper etc. 


If you would like to participate in future Cards For Cause Drive With Me, Please drop your mail id below.

Hope you like these cards.

With love,
Dr. Neha Sanwalka Rungta 

Saturday, March 11, 2017

30th Anniversary Card

Hi friends,

I am here with my very 1st pop-up card. I made this card for 30th Anniversary of my brother-in-law's parent's anniversary. 


Materials Used:
  • Iris Cardstock 270 gsm
  • Mudra Botanical Blooms Stamp Set 
  • Altenew, Memento & Archival Inks 
  • Concord & 9th Perfectly Penned Stamp Set
  • Pearl stickers
  • Artistry Inks: Lime Kiss & Orange Popsicle
  • Pattern paper from Eno - Greetings 
  • Love Sentiment (I brought it in destash & I am not aware of brand)
Method:
  • Cut the card stock to size for the front and the pop-up element
  • Using a blending tool, apply artistry inks on the card front and the pop-up base & mist with water on the card front
  • Create pop-up element to create a stacked cake look
  • Using Altenew, Memento and Archival Inks, stamp the botanical blooms flowers and leaves and fussy cut them
  • Stamp sentiment on the front panel of the card & the inside of pop-up element
  • Cut pattern paper from Eno-Greetings to size. Attach the pop-up element on the white side of pattern paper and front panel on the printed size on top
  • On the front panel, add the fussy cut flowers and leaves
  • Add the fussy cut flowers and leaves to pop-up 
  • Embellish with pearl stickers 

Hope you all liked this card. I am also submitting this card to Mucra Challege #7 Celebrations. Mudra is my favourite Indian stamp company & they have some amazing designs & stamp perfectly each time. Mudra is celebrating their 1st Anniversary this month. Here's wishing Mudra many congratulations & many good luck for future.


Love,
Dr. Neha Sanwalka
Crafty Flirtations


Thursday, March 2, 2017

DIY Supply Storage Bins (Pen Stands)

Hi Folks,

We crafters are always looking for storage solutions for our supplies & every few months I find myself re-organising my desk as I wasn't very happy with how I stored my pens, embossing tools, brushes, etc. While I was looking at re-organising day before yesterday and thinking of ways I could store my tools in the most efficient manner, it dawned upon me that I could make supply storage bins or pen stands of different lengths depending on the size of the tools and have a different bin or stand for my pens, brushes, tools, etc. I ended up making 7 (yes you read it right) bins of 3 different sizes to store my tools conveniently and beautifully on my desk. 


 I wanted some of my items like my Pergamano  scissors, the slotted hockey embossing tools, forceps to stand straight in these boxes to avoid any damage to sharp ends or easy accessibility and hence I created small pockets within my boxes itself to hold them upright and strait (as seen in orange & red boxes)


Tools: 

  • We R Memory Keepers Gift Box Punch Board
  • Textured cardstock from Rainbow Craftykari (This card stock is double ply & very thick & was ideal for these boxes)
  • Some fancy lace from my stash
  • Glue


Dimensions:

Orange Box:  
Card stock size: 9" * 9"
Final Box size: 3.25" * 3.25" * 2.5"
Strait line to be scored at L & diagonal line at M
Red Box: 
Card stock size: 10*10
Final box size: 3.25" * 3.25" * 3.25"
Strait line to be scored at L & diagonal line at L
Yellow Box: 
Card stock size 11*11
Final box size: 3.25" * 3.25" * 4"
Strait line to be scored at L & diagonal line at XL

Make boxes as we do using the gift board punch box and glue the sides and the top flaps in to make a open box pen stand and the best thing, you need hardly 5 minutes to make each box.

You could decorate these boxes the way you want, I opted for lace as I wanted to keep it simple.

Hope I have inspired you to make your storage supply bins/ pen stands.

Love,
Dr. Neha Sanwalka
Crafty Flirtations 

Wednesday, March 1, 2017

Nickname. Day 3 of 30 Day Art Journal Class

Hi friends,

The day 3 prompt of 30 Day Art Journal Class was "Nicknames or love names used by friends/ parents/ spouse"

Story Behind my page: Neha is itself a short name & I hate when people bend it weird ways to form nickname for me. However, there is one nickname that I love and its short form of my name "NE". While I was in Pune for my higher studies, 2 of my roommates "Soumya" & "Vagisha" gave me this name affectionately & it stayed on with me completely


  • There are loads of layers in this page. Using round ink blending tools, I applied dots or you can say blotches of "Vintage Photo" & "Black Soot" distress ink on the background. 
  • Then I applied a very light coat of gesso over the entire page
  • Once the gesso was dry, I covered the whole page with "Pumice Stone" Distress stain
  • I then doodled "NE" with "Sakura Microns" and added shading using pencil colours
  • I somehow felt the page looked dull so I went on the apply Ranger "Vintage Photo" crackle paint all around the doodle
  • Once the crackle paint had dried, using a felt applicator, I dabbed "Cranberry" & "Eggplant" alcohol Ink over the crackle paint to highlight the cracks. 
I like how I am learning new techniques while making these journal pages. I had almost decided that I need to destash my alcohol inks but loved the results of dabbing of alcohol Inks on crackle paint, so I am going to explore this even further 

Links of previous pages:
Page 1  

Hope you all liked my Day 3 page. 

Love,
Dr. Neha Sanwalka
Crafty Flirtations


Saturday, February 18, 2017

Double Heat Embossed Flowers

Hi Friends,

Today I bring to you an experiment that I have been wanting to do for a long time & the results of which I am totally in love with. I used Mudra Daisy Bloom Layering Stamp Set. I have double heat embossed the flowers in the card below, i.e. both the yellow & red in the card below are heat embossed. Read below for instructions


Close Up Of Flower: I love how the red & yellow split and mix to form orange and give a very rustic & realistic look to the flowers


Material:
  • Mudra Daisy Bloom Stamp Set
  • Mudra Happy Birthday Sentiment Stamp Set
  • Watermark Versamark Ink
  • WOW Primary Yellow embossing powder
  • WOW Primary Cherry Red embossing powder
  • Scattered Straw Distress Ink
  • White Cardstock, Vellum & Ranger Heat gun
Instructions:

  • Stamp the 1st layer of Daisy Bloom stamp with Versamark ink, sprinkle with WOW Primary Yellow embossing powder and heat set
  • Stamp the 2nd layer of Daisy Bloom stamp with Versamark ink, sprinkle with WOW Primary Cherry Red embossing powder and heat set just enough to melt the red embossing powder into yellow. Be careful to not overheat
  • Distress edges of cardstock with scattered straw distress ink
  • Stamp the "Happy Birthday" sentiment on vellum with Versamark ink, sprinkle with WOW Primary Cherry Red and heat set
  • Put the card together and add some sequins to complete the card
Hope you all love the double heat embossed flowers on my card.

Do leave some love if you liked the card.

Love,
Dr. Neha Sanwalka
Crafty Flirtations 

Thursday, February 16, 2017

Lets Get Inky - Paper comparisons

Hi Friends,

A few days back, The Craft Studio launched 2 sets of paper: Floral Natura Collection (FNC) and Floral Super White Collection (FSWC). I received a pack of sample papers from Foram Shah & Dinesh Shah of The Craft Studio.

About these papers: 
Both FNC and FSWC are 270 gsm in weight. FSWC is pure white and is more whiter than Iris paper while FNC is one shade pale and has colour same as Iris paper. FNC and FSWC have good water retention ability with FSWC being able to absorb more water as compared to FNC.

Even thought these papers were launched as papers to make flower, with 270 gsm and good water absorbing properties, I decided to try them for my card backgrounds and inking techniques, heat embossing, water colouring etc. and compare it with Iris paper (as I use the same for background techniques regularly).

So, FNC, FSWC and Iris paper were cut to ATC size of 2.5" by 3.5" and put to test for various techniques

Test 1: Distress ink & misting.
Result: My experience in Mumbai city has been that when you use distress ink on Iris paper and let it sit for some time, the distress ink goes a shade lighter. Similar results were seen on FNC & FSWC. So compares with Iris paper exactly


Test 2: Distress Ink Blending
Result: Distress Ink Blending was good on both FNC & FSWC and comparable with Iris paper. FNC overall had slightly better outcome for ink blending as compared to FSWC


Test 3: Distress ink  smooshing with help of acrylic block
Result: Results were good for all 3 papers (The acrylic block I used had a grid and there were grid marks on the outcome. As you notice, grid marks are almost negligible on FSWC, which I assume are because of its high water soaking capacity. So I would choose FSWC for this technique)


Test 4: Distress ink smooshing with water mist from a craft mat
Result: Excellent for all 3 papers


Test 5: Water lifting technique
Result: Even though all 3 papers worked well for water lifting technique, FSWC performed much better than FNC for this technique. I love the outcome for water lifting on Iris and FSWC more than FNC


Test 6: Stamping with distress ink
Result: Similar effect on all 3


Test 7: Watercolour 
Result: With my limited knowledge in water colouring, I tried all 3 papers for water colouring a Peony. All 3 papers worked equally well for this technique. Amongst 3, FSWC with it high water absorbing capacity worked the best for water colouring.


Test 8: Stamping with Archival inks
Results: Fantastic for all 3 papers


Test 9: Heat Embossing & Resist distress inking
Result: Excellent for all 3 papers


Test 10: Pencil colour & blending with odourless thinner


Test 11: Gelatos for background & blending with baby white
Result: Good for all 3


Test 12: Cosmic Shimmer Spray & Itsy Bitsy Splash Spray for background & Scoring
Result: To test the strength of both FNC & FSWC, I scored both the papers & neither paper tore, i.e. they scored well. Also water based spray paints like Cosmic Shimmer Spray & Itsy Bitsy Splash Spray worked well on both papers 


To sum up, both papers were comparable to Iris paper for most techniques and give excellent results. 

Thank you Forum & Dinesh Shah for the free samples. I loved working with both of them. 

PS: I would be converting these into ATCs. So if anyone would like to swap/ trade one of these ATCs with me, please leave a comment. I am open to swapping internationally too. 

Hope you all enjoyed comparison review of FNC & FSWC with Iris paper. Do leave your feedback in comments below. 

Love,
Dr. Neha Sanwalka
Crafty Flirtations